iframe跨網域(iframe cross domain)

在大部分的瀏覽器中(chrome、firefox、IE8…),可以使用postMessage和onmessage,去互相傳遞資料postMessage負責丟到不同網域,onmessage則是監聽其他網域丟來的資料。

主要domain:
1
2
3
4
5
6
7
8
9
10
11
12
13
14
15
16
17
18
19
20
21
22
23
24
25
26
27
<html>
<head>
<script>
window.onmessage = function(){
console.log(arguments);
};
/*if(window.addEventListener){
window.addEventListener("message",function(){
console.log(arguments);
},false);
}else{
window.attachEvent("onmessage", function(){
console.log(arguments);
});
}*/

</script>

</head>
<body>
<iframe src="http://127.0.0.1/otherDomain.html" id="iframe1"></iframe>
<script>
var win = document.getElementById("iframe1").contentWindow;
setTimeout(function(){
win.postMessage("Hello Sparrow!","http://127.0.0.1/");
},1000);
</script>

</body>
</html>
其他domain(otherDomain.html):
1
2
3
4
5
6
7
8
9
10
11
12
<html>
<head>
</head>
<body>
<script>
window.onmessage = function(){
console.log(arguments);
};
parent.postMessage("test","http://localhost/");
</script>

</body>
</html>
那麼如果要運行在IE7、IE6底下呢?

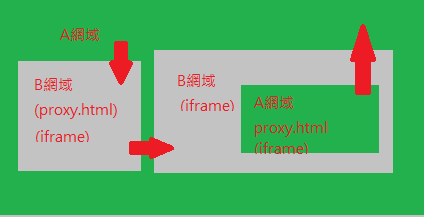
這時候可以建立一個proxy.html利用iframe的src嵌入一個proxy.html至於proxy.html需要抓取網址上的參數透過window.frames[“iframe1”]得方式傳遞。動態載入proxy.html,當資料傳遞完畢,將proxy.html的iframe動態移除,監聽事件可以使用onload去監聽。(換句話說,每次傳遞資料都是一次request,另外也可以使用hash”#”去實作)

圖中灰色的proxy.html可透過window.parent.frames[“iframe1”]的方式,而綠色則要使用parent.parent ,或parent.frames[“parent”]。同顏色可透過js語法直接呼叫,不同顏色必須透過proxy.html去抓取url參數,再丟到同網域的頁面。

android google map key

在android使用google map api時,必須需要有一個key,才能使用google map api。

首先在linux環境底下,執行以下command line:

keytool -list -keystore ~/.android/debug.keystore

輸入密碼可以直接按enter,接著你會得到一串md5。

接著你可以經由google得到一串key,把key加入到layout裡,或者直接建立MapView object也可輸入

<com.google.android.maps.MapView
    android:id="@+id/mapview"
    android:apiKey="your key"
    android:layout_width="fill_parent"
    android:layout_height="fill_parent"
    android:enabled="true"
    android:clickable="true"
/>
配置AndroidManifest.xml
<?xml version="1.0" encoding="utf-8"?>
<manifest xmlns:android="http://schemas.android.com/apk/res/android"
      package="com.test.test"
      android:versionCode="1"
      android:versionName="1.0">
    <application android:label="@string/app_name" android:icon="@drawable/icon">
        <uses-library android:name="com.google.android.maps" />
        <activity android:name="GMapView"
                  android:label="@string/app_name">
            <intent-filter>
                <action android:name="android.intent.action.MAIN" />
                <category android:name="android.intent.category.LAUNCHER" />
            </intent-filter>
        </activity>
    </application>
    <uses-permission android:name="android.permission.ACCESS_FINE_LOCATION"/>
    <uses-permission android:name="android.permission.INTERNET" />
</manifest> 

其中uses-library是必須的,uses-permission則是根據你使用的api功能決定。


如果要能到android market上,你必須另外申請一組key,而不是用android debug key。

你可以使用以下command line去建立一個keystore:

keytool -genkey -v -keystore test.keystore -alias test -keyalg RSA -keysize 2048 -validity 10000

同樣使用md5去取得key,執行以下command line:

keytool -list -keystore test.keystore

接著拿去google取得key配置方法如上。

最後一個步驟,就是將你的未驗證的apk,去做驗證,command line如下:

jarsigner -verbose -keystore my-release-key.keystore my_application.apk alias_name

以及優化指令:

zipalign -v 4 your_project_name-unaligned.apk your_project_name.apk

若是使用ant,只要在build.properties加入以下兩行:


key.store=my-release-key.keystore

key.alias=alias_name

再執行ant release,即可產生驗證後的apk

申請keystore及驗證頁面

取得map key的說明頁面

經由md5取得map key
svn server 搬移

當svn server網址改變時,或者移動資料夾,可以使用switch指令,將client導向正確的svn server位置。

command line如下:

svn switch –relocate http://xxx.xxx.xxx/ http://xxx.xxx.xxx/new/

前面path為目前指向位置,後面則為新的path位置。


需要將專案,分開到不同的版本控制記錄,只要多新增幾個repository。

例如:

svn <—建立一個folder

svnadmin create svn/project1 <—建立一個project版本控制

svnadmin create svn/project2 <—建立一個project版本控制

然後再啟動svn server即可:

svnserve -d -r svn


svn checkout路徑:

svn co http://xxx.xxx.xxx/project1

svn co http://xxx.xxx.xxx/project2