Aws s3 on python

在python要使用aws的s3,官方建議是透過boto這套libs。

Dependency

  • boto

Install

1
sudo pip install boto

Usage

Creating a Connection:

設定access和secret key,其中host為上傳s3位置。

1
2
3
from boto.s3.connection import S3Connection

conn = S3Connection('<aws access key>', '<aws secret key>', host = 's3.amazonaws.com' )

Getting a bucket:

如果你已經在s3的頁面建立好bucket了,可以直接使用get_bucket:

1
bucket = conn.get_bucket( 'mybucket' )

或者自己建立:

1
bucket = conn.create_bucket('mybucket')

Storing Data:

使用key去建立一個檔案,其中k.key這個值,假設有多層folder直接設定在此:

1
2
3
4
5
from boto.s3.key import Key

k = Key(bucket)
k.key = 'folder/test.txt'
k.set_contents_from_string('This is a test of S3')

之後只要在重新連線,透過k.get_contents_as_string()就可以取得到資料了。

如果要上傳一個file的話,可透過set_contents_from_filename,會將你local端的foo.jpg上傳至s3:

1
k.set_contents_from_filename('foo.jpg')

要下載則是採用get_contents_to_filename

1
k.get_contents_to_filename('bar.jpg')

最後如果想透過變數去儲存至s3,一樣使用set_contents_from_string

1
2
3
4
5
6
7
f = open( "foo.jpg", "rb" )

data = f.read()

f.close()

k.set_contents_from_string( data )

以上這些方式,需檢查k.key是否對應好s3上面的路徑。

Flask-Babel example

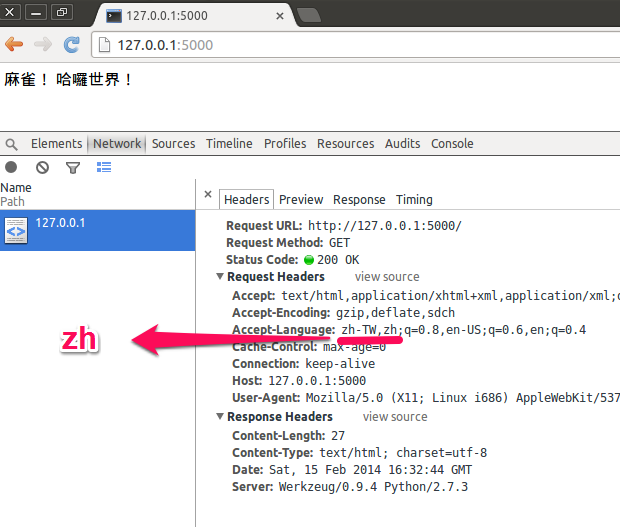
flask的support多國語言的方式,與python本身的gettext方式相同,都是去parse檔案裡頭含有gettext這類的語法,然後在將檔案轉成.po檔,去編輯相關的對應文字,接著放在相對應的folder,例如zhen的字眼,最後在轉成.mo,實際執行gettext會讀取.mo

Demo screenshot

Demo image

假設預設的配置如下:

1
2
3
4
5
6
7
.
├── app.py
├── babel.cfg
├── mysettings.cfg
├── README.md
└─── templates
   └── index.html

mysettings.cfg設定預設的語系(在多國語系找不到時,將會預設英文):

1
BABEL_DEFAULT_LOCALE="en"

透過from_pyfile載入:

1
app.config.from_pyfile('mysettings.cfg')

預設web接受的語系:

1
2
3
4
5
6
7
8
9
10
@babel.localeselector
def get_locale():
# if a user is logged in, use the locale from the user settings
user = getattr(g, 'user', None)
if user is not None:
return user.locale
# otherwise try to guess the language from the user accept
# header the browser transmits. We support de/fr/en in this
# example. The best match wins.
return request.accept_languages.best_match(['en','zh'])

產生.po和.mo檔

babel.cfg設定要parse的路徑:

1
2
3
[python: **.py]  
[jinja2: **/templates/**.html]
extensions=jinja2.ext.autoescape,jinja2.ext.with_

接著只要在專案的根目錄執行以下command,就會取得messages.pot檔案:

1
pybabel extract -F babel.cfg -o messages.pot .

編輯好message.mo,初始化語系路徑以及設定語系:

1
pybabel init -i messages.pot -d translations -l zh

產生translations/de/LC_MESSAGES/messages.po此路徑。

最後在將translations底下的.po檔案轉換成.mo檔即可:

1
pybabel compile -d translations

完成範例

python encode

在作業系統上都有預設語言,例如windows上預設可能是big5,linux則是utf8。當python要轉換編碼的時候,可以使用encode,但是有個先決條件,必須要先把編碼轉換成作業系統的預設語言

以linux為例,要轉成big5,需先decode成utf8,在encode成big5:

1
2
3
4
5
6
# -*- coding: utf-8 -*-

u_hello = "哈囉".decode("utf8")
big5_hello = u_hello.encode("big5")

print big5_hello

接著將轉換過得字串寫入到檔案,在用gedit、word…之類的軟體,以big5編碼開啟就能看到剛剛寫入文字。

1
2
3
4
#write to file
f = open( "big5_text.txt", "w" )
f.write( big5_hello )
f.close()

另外在字串前面加個u,和decode成utf8相同:

1
2
3
4
5
6
7
8
9
10
11
>>> u"哈囉" == "哈囉".decode("utf8")
True

>>> type("哈囉")
<type 'str'>

>>> type(u"哈囉")
<type 'unicode'>

>>> type("哈囉".decode("utf8"))
<type 'unicode'>

如果是windows的作業系統,只要先將decode成big5,即可轉成其他編碼。

icon converter

在地圖上要顯示marker,大多數都是使用固定幾個icon,以類別當作區分。如果能更直覺得辨識marker,讓user不用經由點擊,就得知marker的意義,應該會讓user更有觀看地圖意願。所以就寫了一個簡單的功能,讓圖片轉成icon。

Install:

git clone https://github.com/SparrowJang/icon_converter

cd icon_converter

sudo python setup.py install

經由url的image轉換成icon :

from icon_converter import converter

#target image ( http or local )
path = "http://example.com/test.png"

#resize and crop image
size = {"width":40,"height":40}

border = {
    "size":{"width":2,"height":2},
    "color":"#BBBBBB",
    "backgroundColor":"#FFFFFF"
}

blob = converter.convert_by_path( path, size, border )

f = open( "icon.png", "w" )

f.write( blob.data )

f.close()

github

sqlite adapter and converter

在sqlite中,要將python的object存入sqlite,可以透過在class實作conform method,或者是透過sqlite提供的register_adapter,再者就是先將object轉換成sqlite有的type,在存入即可。不過透過以上的方式,其實實作邏輯都是相同,只有透過不同存取介面。

conform為例:

import sqlite3

class Point(object):
    def __init__(self, x, y):
        self.x, self.y = x, y

    def __conform__(self, protocol):
        if protocol is sqlite3.PrepareProtocol:
            return "%f;%f" % (self.x, self.y)

con = sqlite3.connect(":memory:")
cur = con.cursor()

p = Point(4.0, -3.2)
cur.execute("select ?", (p,))
print cur.fetchone()[0]

point會將值轉成string,最後會輸出"4.000000;-3.200000",另外%f指的是浮點數。

透過register_adapter:

def adapt_point(point):
    return "%f;%f" % (point.x, point.y)

sqlite3.register_adapter(Point, adapt_point)

只要在connect之前註冊好adapter,point就會自動轉成定義後格式。

如果要將以存入的值,轉回原先的object,這時可透過converter

def convert_point(s):
    x, y = map(float, s.split(";"))
    return Point(x, y)

# Register the converter
sqlite3.register_converter("point", convert_point)

以上方式定義後,還必須在connect的時候,設定detect_types的參數,下面有3種方式。

第一種使用sqlite3.PARSE_DECLTYPES

con = sqlite3.connect(":memory:", detect_types=sqlite3.PARSE_DECLTYPES)
cur = con.cursor()
cur.execute("create table test(p point)")

cur.execute("insert into test(p) values (?)", (p,))
cur.execute("select p from test")
print "with declared types:", cur.fetchone()[0]

必須要在create table的時候,就是先定義好point type,之後query出來會自訂轉成object。

第二種方式使用sqlite3.PARSE_COLNAMES

con = sqlite3.connect(":memory:", detect_types=sqlite3.PARSE_COLNAMES)
cur = con.cursor()
cur.execute("create table test(p)")

cur.execute("insert into test(p) values (?)", (p,))
cur.execute('select p as "p [point]" from test')
print "with column names:", cur.fetchone()[0]

這種方式則是在query的時候,指定query欄位的type( p [point] )。

最後一種方式,就是兩種一起用:

con = sqlite3.connect(":memory:", detect_types=sqlite3.PARSE_DECLTYPES|sqlite3.PARSE_COLNAMES)

python sqlite3 row_factory and text_factory

row_factory

主要功能是改變sqlite抓取到資料,回傳的output的格式。

例如原先的output type是tuple:

cursor.execute("select 1 as a")
result = cursor.fetchone()
print type(result) is tuple

如果要使用dict,可以覆蓋row_factory

import sqlite3

def dict_factory(cursor, row):
    d = {}
    for idx, col in enumerate(cursor.description):
        d[col[0]] = row[idx]
    return d

con = sqlite3.connect(":memory:")
con.row_factory = dict_factory
cur = con.cursor()
cur.execute("select 1 as a")
print cur.fetchone()["a"]

其實也可以直接使用官方預設的sqlite3/336/)./336/)Row

con.row_factory = sqlite3.Row
cur = con.cursor()
cur.execute("select 1 as a")
result = cur.fetchone()
#1
print result["a"]
#1
print result[0]
#1
print len( result )
#["a"]
print result.keys()

text_factory

只要query出來的內容是text,就會經過這個function,可以用於字串編碼轉換,當然也可以利用這個方式去修改內容.。

以下是簡單example:

import sqlite3

con = sqlite3.connect(":memory:")
cur = con.cursor()

AUSTRIA = u"\xd6sterreich"

cur.execute("select ?", (AUSTRIA,))
row = cur.fetchone()

#<type 'unicode'>
print type(row[0])

con.text_factory = str
cur.execute("select ?", (AUSTRIA,))
row = cur.fetchone()

#<type 'str'>
print type(row[0])

con.text_factory = lambda x: unicode(x, "utf-8", "ignore")
cur.execute("select ?", ("this is latin1 and would normally create errors" +
                         u"\xe4\xf6\xfc".encode("latin1"),))
row = cur.fetchone()

#<type 'unicode'>
print type(row[0])

con.text_factory = sqlite3.OptimizedUnicode
cur.execute("select ?", (AUSTRIA,))
row = cur.fetchone()

#<type 'unicode'>
print type(row[0])

con.text_factory = sqlite3.OptimizedUnicode
cur.execute("select ?", ("test",))
row = cur.fetchone()

#<type 'str'>
print type(row[0])

其中sqlite3.OptimizedUnicode會自動偵測轉換不同編碼,如果字串是 ASCII可以顯示的,將會回傳str,否則回傳unucode。


題外話:

如果發現import sqlite3找不到module…,讓就必須在重新編譯python…,在編譯之前先執行:

sudo apt-get install libsqlite3-dev

在重新編譯python安裝即可。

python sqlite3 create function、aggregate and collation

create_function

如果在sqlite想自訂function,可使用create_function來處理,以下是範例:

import sqlite3
import md5       

def md5sum(t):
    return md5.md5(t).hexdigest()

con = sqlite3.connect(":memory:")
con.create_function("md5", 1, md5sum)
cur = con.cursor()
cur.execute("create table test(i)")
cur.execute("insert into test(i) values (1)")
cur.execute("insert into test(i) values (2)")
cur.execute("select md5(i) from test")
print cur.fetchall()

執行後會回傳以下結果:

[(u'c4ca4238a0b923820dcc509a6f75849b',), (u'c81e728d9d4c2f636f067f89cc14862c',)]

從上面結果可以看出,在每筆資料中都是獨立的,只將原先輸入的值或欄位值去處理。另外connect的部份,是直接使用記憶體,而不是file方式,所以程式結束後,就釋放掉了。

create_aggregate

那麼如果製作一個類似count、sum之類的功能,可以使用create_aggregate,以下是官方範例:

import sqlite3 

class MySum:   
    def __init__(self):
        self.count = 0

    def step(self, value):
        self.count += value 

    def finalize(self):
        return self.count

con = sqlite3.connect(":memory:")
con.create_aggregate("mysum", 1, MySum)
cur = con.cursor()
cur.execute("create table test(i)")
cur.execute("insert into test(i) values (1)")
cur.execute("insert into test(i) values (2)")
cur.execute("select mysum(i) from test")
print cur.fetchall()

執行後回傳結果:

[(3,)]

當執行select的時候,會呼叫mysum,mysum的step會將所有傳入值累加,在由finalize回傳結果,這樣就可以處理每筆資料之間的關係。

create_collation

最後create_collation處理的功能,就是排序問題,可以依照自己自訂方式排序,官方提供的範例是反向功能(reverse),如下:

import sqlite3 

def collate_reverse(string1, string2):                
    return -cmp(string1, string2)                     

con = sqlite3.connect(":memory:")                     
con.create_collation("reverse", collate_reverse)      

cur = con.cursor()                                    
cur.execute("create table test(x)")                   
cur.executemany("insert into test(x) values (?)", [("a",), ("b",)])
cur.execute("select x from test order by x collate reverse")
for row in cur:
    print row

con.close() 

執行結果如下:

(u'b',)
(u'a',)

collate_reverse(cmp)會將兩個值做比較,將會回傳-1、0、1這3種結果:

string1 < string2 回傳 -1 
string1 == string2 回傳 0 
string1 > string 2 回傳 1

所以官方範例,最後只要在cmp加個負號,所有排序都會相反。

Python class decorators for classes

decorator是一個滿常使用的方式,只要透過裝飾,就能很容易新增一個功能,然而被裝飾者,完全不必知道裝飾者的存在,減少耦合性。

例如今天有一個Canvas,要將文字畫在canvas上,並且加上邊框,文字並不需要知道邊框存不存在,這時就可以使用decorator附加上去。

Example:

首先簡單定義一個canvas,draw會先將內容寫在變數裡,然後在由show將結果顯示在terminal上面。

class Canvas( object ):
    """
    Define a sample canvas for terminal.
    """

    def __init__( self, width=15, height=5 ):
        """
        Init a params.
        """

        self.__data = []
        self.__width = width
        self.__height = height
        self.__setup( width, height )

    def __setup( self, width, height ):
        """
        Create a data block.
        """

        for hi in range( height ):

            self.__data.append( [] )

            for wi in range( width ):

                self.__data[ hi ].append( " " )

    def draw( self, content, x, y ):
        """
        Draw content to data block.
        """

        width = self.__width

        for char in content:

            if x >= width:

                break

            self.__data[y][x] = char

            x = x + 1

    def show( self ):
        """
        Print to terminal.
        """

        for hi in range( self.__height ):

            print "".join( self.__data[ hi ] )

接著View定義了基本的位置,和width計算,在由drawTo繪製到canvas。

class View( object ):
    """
    Define a sample view.
    """

    def setY( self, y ):
        """
        Set a position of y.
        """

        self._y = y

    def getY( self ):
        """
        Get a position of y.
        """

        return self._y

    def setX( self, x ):
        """
        Set a position of x.
        """

        self._x = x

    def getX( self ):
        """
        Get a position of x.
        """

        return self._x

    def getWidth( self ):
        """
        Get the view width.
        """

        return 0

    def drawTo( self, canvas, parent = None ):
        """
        Draw something to canvas.
        """

        pass

定義一個decorator,讓border裝飾。

class ViewDecorator( object ):
    """
    Decorator of View.
    """

    def __init__( self, *views ):

        self.__views = views

    def __call__( self, drawTo ):
        views  = self.__views;

        def draw_chain( base_view, canvas ):

            drawTo( base_view, canvas )

            for view in views:

                view.drawTo( canvas, base_view )

        return draw_chain

Text和border分別繼承於View,text會將文字畫到canvas,而border則是畫框([]),此時可以看到text已經裝飾了border &quot;@ViewDecorator``( Border() )&quot;

class Border( View ):
    """
    Extend a View.
    """

    def drawTo( self, canvas, parent = None ):
        """
        Draw a border to canvas by parent position.
        """

        if parent:

            width = parent.getWidth()
            x = parent.getX()
            y = parent.getY()
            canvas.draw( "[", x - 1 , y )
            canvas.draw( "]", width + x , y )

class Text( View ):
    """
    Extend a view.
    """

    def __init__( self, content ):
        """
        Set a text.
        """

        self.__content = content

    def getWidth( self ):
        """
        Get a width of text.
        """

        return len( self.__content )

    @ViewDecorator( Border() )
    def drawTo( self, canvas, parent = None ):
        """
        Draw a text to canvas.
        """
        canvas.draw( self.__content, self.getX(), self.getY() )

執行python decorator.py

canvas = Canvas()
text = Text( "Sparrow" )
text.setX( 3 )
text.setY( 2 )
text.drawTo( canvas )
canvas.show()

最後就會顯示下列資訊在螢幕上。

[Sparrow]

source code

python https

如果是https,可能會有以下錯誤:

urlerror urlopen error unknown url type https

解決方法:

需先安裝libssl-dev。

sudo apt-get install libssl-dev

開啟Modules/Setup文件,把以下的#移除:


SSL=/usr/local/ssl

_ssl _ssl.c \

        -DUSE_SSL -I$(SSL)/include -I$(SSL)/include/openssl \

        -L$(SSL)/lib -lssl -lcrypto


重新編譯python即可。

python install easy_install

先至官方下載

https://pypi.python.org/pypi/setuptools

然後執行完成,就安裝完畢:

chmod +x setuptools-0.6c11-py2.7.egg

./setuptools-0.6c11-py2.7.egg

如果發生以下錯誤,需重新安裝python:

zipimport.ZipImportError: can't decompress data; zlib not available 


重新編譯python:

cd ~/tmp/Python-2.7.3

./configure

vi Modules/Setup

找到#zlib zlibmodule.c -I$(prefix)/include -L$(exec_prefix)/lib -lz  (移除#)

make & make install

然後在重新安裝easy_install即可。