Neo4j - Getting started

neo4j relationship pic

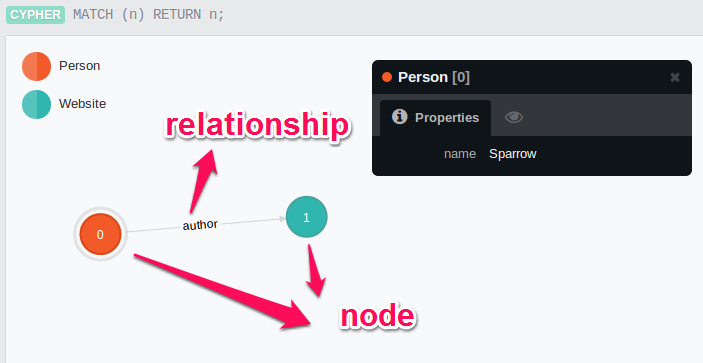
neo4j是一種圖形資料庫,同時也是nosql的一種,每筆資料為一個node,在node上可以定義label,類似於其他資料庫的table/collection。假設有個Person的collection,要定義PersonPerson之間的關係,勢必得額外定義一個collection或者field,去描述PersonPerson之間的關係,但是neo4j並不需要額外的collection或field,只要定義好Person這個label,當關係產生時,在額外描述PersonPerson之間關係(relationship)為何,換句話說一開始建立Person的node時,並不需要定義PersonPerson的關係。

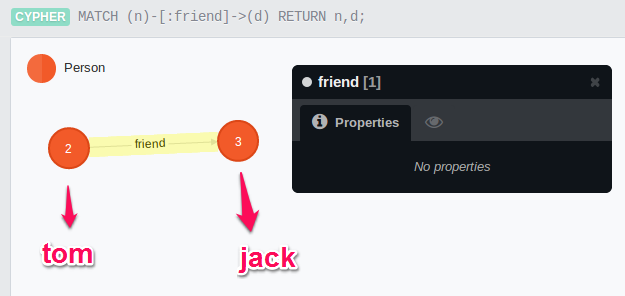
舉例來說,如果今天Tom和Jack就讀同一個學校同一個班級,現在的關係是classmate,當熟識之後,這時關係可能是friend,這時就必須建立friend的關聯(朋友本身是雙向的,這邊以單向為例)。

tom-->jack

在neo4j建立Persontypefriend關聯的語法會如下:

1
CREATE (Tom {name:"tom"})-[:friend]->(Jack {name:"jack"});

如果單純的建立relationship,需先抓取tom和jack兩個人:

1
2
3
4
MATCH (tom), (jack)
WHERE tom.name = "tom" and jack.name = "jack"
CREATE (tom)-[:friend]->(jack)
RETURN tom,jack;

Neo4j中的Nodes

在neo4j中的node,可以寫成以下幾種方式:

  • (a)
  • (a:Person) 指定label為Person
  • () 以匿名的方式

括號中的a,如同(),唯一不同之處,可以在MATCH時,透過a來做比對,而透過:Person這種指定label的方式,可以明確要查詢的label名稱,同樣也會增加query的效率。

Neo4j中的Relationships

在neo4j中的關係(relationship)表示方式,以中括弧[]作為表示,可以參考以下幾種:

  • (a)-[r]->(m) 定義a點到m點之間的關係
  • (a)-[:ACTED_IN]->(m) 定義a點到m點之間的關係,其中定義:ACTED_IN的label,為描述a與m之間的關係

Labels

不管是noderelationship都可以定義一個甚至多個label。下方以定義一個label為例:

  • (a:Person)
  • (a:Person {name:"Keanu Reeves"})
  • (a:Person)-[:ACTED_IN]->(m:Movie)

CREATE

建立一個node,label為Person{name:"tom"}為node被建立的資料。最前面的tom只是一個變數,在這個語法中並不會被使用到。

1
CREATE (tom:Person {name:"tom"});

建立classmaterelationship,其中classmaterelationship中,被稱為type

1
CREATE (Tom {name:"tom"})-[:classmate]->(Jack {name:"jack"});

如果要描述關係的其他屬性,例如什麼時間點成為classmate,可在關係中附加資料。

1
CREATE (Tom {name:"tom"})-[:classmate {start_date:"2012/01/05"}]->(Jack {name:"jack"});

CREATE INDEX

依照name去建立index,在search中效率會提昇許多。

1
CREATE INDEX ON :Person(name);

MATCH

如果要回傳所有node筆數的資料如下。

1
MATCH (p) RETURN p;

找出有建立relationship的node,可以這樣寫。

1
MATCH (t)-->(j) RETURN t,j;

若是要依照type去search,例如要找是friend關係的,列出Person的name。

1
MATCH (t)-[:friend]->(j) RETURN t.name,j.name;

查詢PersonPerson之間的關係,可以透過type這個function。

1
MATCH (t)-[r]->(j) RETURN t.name, type( r ),j.name;

WHERE

要search某個屬性,可透過where,例如找name是tom的人。

1
2
3
MATCH (t)
WHERE t.name = "tom"
RETURN t;

同樣的查詢條件,也可直接透過下面這種方式,寫法更為簡短。

1
2
MATCH (t {name:"tom"})
RETURN t;

Order

依照出生日期作排序。

1
2
3
MATCH (a:Person)
RETURN a.name, a.born
ORDER BY a.born

Limit and Skip

limit指的是query後的資料要抓幾筆,而skip則是從第幾筆開始抓取。

從第10筆開始抓取,最多抓10筆。

1
2
3
4
MATCH (a)
RETURN a.name
SKIP 10
LIMIT 10;

nodes

在path中,回傳所有節點。

1
MATCH p = (t)-[:friend]->(j) RETURN nodes(p);

rels

在path中,回傳節點對應的關係。

1
MATCH p = (t)-[:friend]->(j) RETURN rels(p);

DISTINCT

假設有兩個Person的名稱為相同,此時要列出所有Person的name,這時可透過DISTINCT把相同name的都過濾掉,

1
2
MATCH (p:Person)
RETURN DISTINCT p;

SET

SET可用於noderelationshiplabel的屬性修改。

例如例如例如例如設定movie釋出時間。

1
2
3
4
MATCH (movie:Movie)
WHERE movie.title="Mystic River"
SET movie.released = 2003
RETURN movie;

如果要加入一個label,可直接使用SET

1
2
3
4
MATCH (movie:Movie)
WHERE movie.title="Mystic River"
SET movie:Movie
RETURN movie

REMOVE

移除label,直接使用REMOVE即可。

1
2
3
4
MATCH (movie:Movie)
WHERE movie.title="Mystic River"
REMOVE movie:Movie
RETURN movie

DELETE

刪除noderelationship

刪除一個節點。

1
2
MATCH (n { name: 'Peter' })
DELETE n

MATCH Depth Relationship

a到b所包含多個relationship

1
(a)-[*]->(b)

a到b包含1~3個relationship,也就是中間含有0~3個node。

1
(a)-[*1..4]->(b)

shortestPath

會自動找出最短路徑,也就是假設a到b點,可能有10個路徑,只會傳一個最短路徑。

1
2
3
4
MATCH (keanu:Person {name:"Keanu Reeves"}), 
(kevin:Person {name:"Kevin Bacon"})
MATCH p=shortestPath((keanu)-[:KNOWS*]->(kevin))
RETURN p;

extract

可在extract執行運算,之後的結果會回傳一個list。寫法包括以下2種:

  • extract(n in nodes(path) | n.name)
  • [ x in coll | expr ]
1
extract(x in [1,2,3] | x*x)

取得keanu知道(relationship)kevin的最短路徑,其中[1..-1]則捨棄list的第一個和最後一個值。

1
2
3
4
MATCH (keanu:Person {name:"Keanu Reeves"}), 
(kevin:Person {name:"Kevin Bacon"})
MATCH p=shortestPath((keanu)-[:KNOWS*]->(kevin))
RETURN [ n in nodes(p)[1..-1] | n.name ];

neo4j可用的function可以參考官方文件。另外可以參考官方的語法對照表官方的online tutorial,對於neo4j學習會有很大幫助。

sqlite adapter and converter

在sqlite中,要將python的object存入sqlite,可以透過在class實作conform method,或者是透過sqlite提供的register_adapter,再者就是先將object轉換成sqlite有的type,在存入即可。不過透過以上的方式,其實實作邏輯都是相同,只有透過不同存取介面。

conform為例:

import sqlite3

class Point(object):
    def __init__(self, x, y):
        self.x, self.y = x, y

    def __conform__(self, protocol):
        if protocol is sqlite3.PrepareProtocol:
            return "%f;%f" % (self.x, self.y)

con = sqlite3.connect(":memory:")
cur = con.cursor()

p = Point(4.0, -3.2)
cur.execute("select ?", (p,))
print cur.fetchone()[0]

point會將值轉成string,最後會輸出"4.000000;-3.200000",另外%f指的是浮點數。

透過register_adapter:

def adapt_point(point):
    return "%f;%f" % (point.x, point.y)

sqlite3.register_adapter(Point, adapt_point)

只要在connect之前註冊好adapter,point就會自動轉成定義後格式。

如果要將以存入的值,轉回原先的object,這時可透過converter

def convert_point(s):
    x, y = map(float, s.split(";"))
    return Point(x, y)

# Register the converter
sqlite3.register_converter("point", convert_point)

以上方式定義後,還必須在connect的時候,設定detect_types的參數,下面有3種方式。

第一種使用sqlite3.PARSE_DECLTYPES

con = sqlite3.connect(":memory:", detect_types=sqlite3.PARSE_DECLTYPES)
cur = con.cursor()
cur.execute("create table test(p point)")

cur.execute("insert into test(p) values (?)", (p,))
cur.execute("select p from test")
print "with declared types:", cur.fetchone()[0]

必須要在create table的時候,就是先定義好point type,之後query出來會自訂轉成object。

第二種方式使用sqlite3.PARSE_COLNAMES

con = sqlite3.connect(":memory:", detect_types=sqlite3.PARSE_COLNAMES)
cur = con.cursor()
cur.execute("create table test(p)")

cur.execute("insert into test(p) values (?)", (p,))
cur.execute('select p as "p [point]" from test')
print "with column names:", cur.fetchone()[0]

這種方式則是在query的時候,指定query欄位的type( p [point] )。

最後一種方式,就是兩種一起用:

con = sqlite3.connect(":memory:", detect_types=sqlite3.PARSE_DECLTYPES|sqlite3.PARSE_COLNAMES)

python sqlite3 row_factory and text_factory

row_factory

主要功能是改變sqlite抓取到資料,回傳的output的格式。

例如原先的output type是tuple:

cursor.execute("select 1 as a")
result = cursor.fetchone()
print type(result) is tuple

如果要使用dict,可以覆蓋row_factory

import sqlite3

def dict_factory(cursor, row):
    d = {}
    for idx, col in enumerate(cursor.description):
        d[col[0]] = row[idx]
    return d

con = sqlite3.connect(":memory:")
con.row_factory = dict_factory
cur = con.cursor()
cur.execute("select 1 as a")
print cur.fetchone()["a"]

其實也可以直接使用官方預設的sqlite3/336/)./336/)Row

con.row_factory = sqlite3.Row
cur = con.cursor()
cur.execute("select 1 as a")
result = cur.fetchone()
#1
print result["a"]
#1
print result[0]
#1
print len( result )
#["a"]
print result.keys()

text_factory

只要query出來的內容是text,就會經過這個function,可以用於字串編碼轉換,當然也可以利用這個方式去修改內容.。

以下是簡單example:

import sqlite3

con = sqlite3.connect(":memory:")
cur = con.cursor()

AUSTRIA = u"\xd6sterreich"

cur.execute("select ?", (AUSTRIA,))
row = cur.fetchone()

#<type 'unicode'>
print type(row[0])

con.text_factory = str
cur.execute("select ?", (AUSTRIA,))
row = cur.fetchone()

#<type 'str'>
print type(row[0])

con.text_factory = lambda x: unicode(x, "utf-8", "ignore")
cur.execute("select ?", ("this is latin1 and would normally create errors" +
                         u"\xe4\xf6\xfc".encode("latin1"),))
row = cur.fetchone()

#<type 'unicode'>
print type(row[0])

con.text_factory = sqlite3.OptimizedUnicode
cur.execute("select ?", (AUSTRIA,))
row = cur.fetchone()

#<type 'unicode'>
print type(row[0])

con.text_factory = sqlite3.OptimizedUnicode
cur.execute("select ?", ("test",))
row = cur.fetchone()

#<type 'str'>
print type(row[0])

其中sqlite3.OptimizedUnicode會自動偵測轉換不同編碼,如果字串是 ASCII可以顯示的,將會回傳str,否則回傳unucode。


題外話:

如果發現import sqlite3找不到module…,讓就必須在重新編譯python…,在編譯之前先執行:

sudo apt-get install libsqlite3-dev

在重新編譯python安裝即可。

python sqlite3 create function、aggregate and collation

create_function

如果在sqlite想自訂function,可使用create_function來處理,以下是範例:

import sqlite3
import md5       

def md5sum(t):
    return md5.md5(t).hexdigest()

con = sqlite3.connect(":memory:")
con.create_function("md5", 1, md5sum)
cur = con.cursor()
cur.execute("create table test(i)")
cur.execute("insert into test(i) values (1)")
cur.execute("insert into test(i) values (2)")
cur.execute("select md5(i) from test")
print cur.fetchall()

執行後會回傳以下結果:

[(u'c4ca4238a0b923820dcc509a6f75849b',), (u'c81e728d9d4c2f636f067f89cc14862c',)]

從上面結果可以看出,在每筆資料中都是獨立的,只將原先輸入的值或欄位值去處理。另外connect的部份,是直接使用記憶體,而不是file方式,所以程式結束後,就釋放掉了。

create_aggregate

那麼如果製作一個類似count、sum之類的功能,可以使用create_aggregate,以下是官方範例:

import sqlite3 

class MySum:   
    def __init__(self):
        self.count = 0

    def step(self, value):
        self.count += value 

    def finalize(self):
        return self.count

con = sqlite3.connect(":memory:")
con.create_aggregate("mysum", 1, MySum)
cur = con.cursor()
cur.execute("create table test(i)")
cur.execute("insert into test(i) values (1)")
cur.execute("insert into test(i) values (2)")
cur.execute("select mysum(i) from test")
print cur.fetchall()

執行後回傳結果:

[(3,)]

當執行select的時候,會呼叫mysum,mysum的step會將所有傳入值累加,在由finalize回傳結果,這樣就可以處理每筆資料之間的關係。

create_collation

最後create_collation處理的功能,就是排序問題,可以依照自己自訂方式排序,官方提供的範例是反向功能(reverse),如下:

import sqlite3 

def collate_reverse(string1, string2):                
    return -cmp(string1, string2)                     

con = sqlite3.connect(":memory:")                     
con.create_collation("reverse", collate_reverse)      

cur = con.cursor()                                    
cur.execute("create table test(x)")                   
cur.executemany("insert into test(x) values (?)", [("a",), ("b",)])
cur.execute("select x from test order by x collate reverse")
for row in cur:
    print row

con.close() 

執行結果如下:

(u'b',)
(u'a',)

collate_reverse(cmp)會將兩個值做比較,將會回傳-1、0、1這3種結果:

string1 < string2 回傳 -1 
string1 == string2 回傳 0 
string1 > string 2 回傳 1

所以官方範例,最後只要在cmp加個負號,所有排序都會相反。

Auto increment in mongodb

mongodb本身並沒有提供auto increment,若要達成與mysqlauto increment相同功能,需要由程式自行控制,或者可以使用findAndModify

例如:

//在counter collection新增一筆資料,紀錄id目前新增至第幾筆
db.counters.insert({_id:"userId",c:0});

//在counters裡,收尋_id 相等於 userId的資料,並且將c的column加一
var counter = db.counters.findAndModify({query:{_id:"userId",update:{$inc:{c:1}}}});

//新增一筆user
db.users.insert( { _id: counter.c, name:"sparrow" } );

//id在加一
counter = db.counters.findAndModify({query:{_id:"userId",update:{$inc:{c:1}}}});

//新增第二筆user
db.users.insert( { _id: counter.c, name:"peter" } );

上面的例子,就是在使用一個collection,來存放目前id的最後遞增值。不過這種作法,在效率上較差,如果id不一定需要為連續的,可使用原先的object id,效率會比上面這種方式快很多。(參考此篇blog

官方的auto increment的實現方式

findAndModify的參數參照