svn server 搬移

當svn server網址改變時,或者移動資料夾,可以使用switch指令,將client導向正確的svn server位置。

command line如下:

svn switch –relocate http://xxx.xxx.xxx/ http://xxx.xxx.xxx/new/

前面path為目前指向位置,後面則為新的path位置。


需要將專案,分開到不同的版本控制記錄,只要多新增幾個repository。

例如:

svn <—建立一個folder

svnadmin create svn/project1 <—建立一個project版本控制

svnadmin create svn/project2 <—建立一個project版本控制

然後再啟動svn server即可:

svnserve -d -r svn


svn checkout路徑:

svn co http://xxx.xxx.xxx/project1

svn co http://xxx.xxx.xxx/project2

yahoo weather api

yahoo的weather api,可透過rss的方式,或使用YQL的方式取得。

以下是使用rss方式:
/**
* w參數,為woeid(每個城市都有一個獨一無二的值)
* p參數為zipCode
* 以上兩個參數使用其中一個就可以了。
*
* u參數為溫度的單位
*/
//xml
http://weather.yahooapis.com/forecastrss
//json
http://weather.yahooapis.com/forecastjson
//exampe:
http://weather.yahooapis.com/forecastrss?w=2442047&u=c
http://weather.yahooapis.com/forecastrss?p=USCA1116

取得woeid和zipCode的頁面http://weather.yahoo.com/

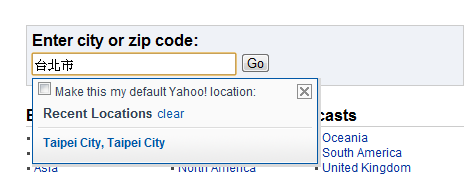
1.輸入城市名稱:

2.取得woeid

3.按此link

4.取得zip code

YQL:

Yql的console page

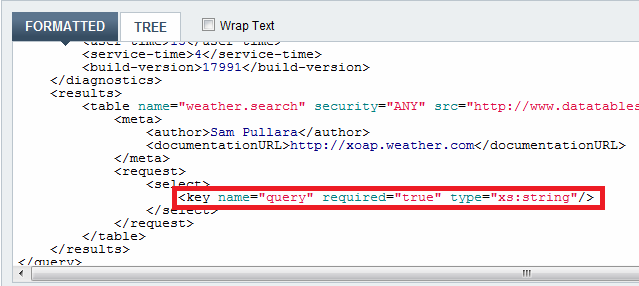
#可以查詢table的欄位
desc weather.search

紅色為欄位名稱

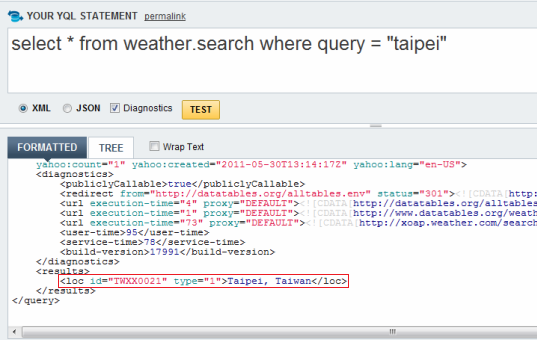
取得城市zip code

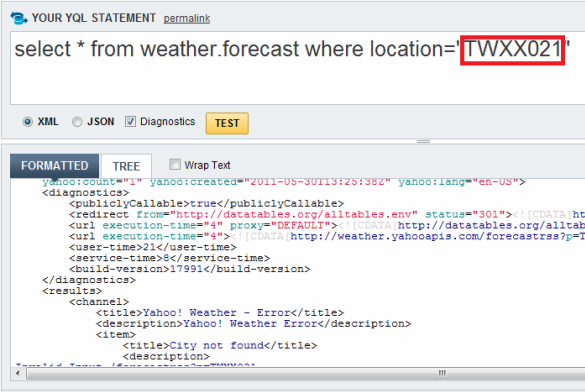
使用剛剛的zip code做收尋

使用http get的網址

/**
* 以下是url的參數
* q:sql語法
* callback:javascript的function名稱
* format:傳回的格式
*/
http://query.yahooapis.com/v1/public/yql

yql可以使用jsonp,也就是javascript callback。至於其他的table查詢,可參考yahoo的文件。

node.js multi-process

node.js本身並不支援multi-process,但是有其他方式可以達成。簡單來說,就是利用node.js的不會阻塞IO的特性,然後去執行終端機(terminal)的command line,然建立監聽事件,就可以達成multi-process。以有人實作出來,使用方法如同browserWorker,可以參考node.js的Worker

以下是一個簡單實作原理的範例:

main.js

var spawn = require('child_process').spawn,
    child_process = spawn('node', ['child.js']);

    child_process.stdout.on('data', function (data) {
      console.log('stdout: ' + data);
    }); 

    setInterval(function(){
      child_process.stdin.write("test");
    },199);

child.js

//當程式執行完畢,不關閉此程序
process.stdin.resume();
process.stdin.setEncoding('utf8');

process.stdin.on('data', function (chunk) {
    console.log('data: ' + chunk);
});

如果想要理解更多,請參考processchild_process的相關event,或者其他人實作的source code

Qunit

Qunitjavascriptunit test之一,這套工具由jquery team撰寫的,使用的方式比起Jsunit,更有javascript風格。

首先要先配置html:
<html>
<head>
    <title>QUnit Test Suite</title>
    <link rel="stylesheet" href="../qunit/qunit.css" type="text/css" media="screen">
    <script type="text/javascript" src="../qunit/qunit.js"></script>
</head>
<body>
    <h1 id="qunit-header">QUnit Test Suite</h1>
    <h2 id="qunit-banner"></h2>
    <div id="qunit-testrunner-toolbar"></div>
    <h2 id="qunit-userAgent"></h2>
    <ol id="qunit-tests"></ol>
    <div id="qunit-fixture">test markup</div>
</body>
</html>

在html配置部分,id名稱必須依照官方的命名,簡單來說只需要將測試的程式,加入到head裡面即可

Qunit所提供的幾個function:
/**
* @param {String} name 單元測試的名稱
* @param {Number} expected 要比對的數量(可選)
* @param {function} test 要測試的function
* asyncTest需要在測試完後,多呼叫一個start()
* 否則將不會向下測試
*/
test(name,expected,test)
asyncTest(name,expected,test)

/**
* @param {Number} amount 要比對的數量
*/
expect(amount)

/**
* @param {String} name module的名稱
* @param {Object} lifecycle 用來配置初始化和結束執行的function(可選)
* 分別為setup和teardown
*/
module(name,lifecycle)

/**
* @param {boolean} state
* @param {String} message
*/
ok(state,message)

/**
* @param {*} actual 比對值
* @param {*} expected 期望值
* @param {String} message (可選)
* equal:actual == expected
* deepEqual:actual === expected(深度比對,會一層一層比對)
* strictEqual:actual === expected
*/
equal(actual,expected,message)
notEqual(actual,expected,message)
deepEqual(actual,expected,message)
notDeepEqual(actual,expected,message)
strictEqual(actual,expected,message)
notStrictEqual(actual,expected,message)

/**
* 繼續往下執行測試
*/
start()
/**
* @param {Number} timeout 延遲向下執行的時間(可選)
* 若無輸入參數會等待呼叫start才會向下執行測試
*/
stop(timeout)
幾個簡單範例:
/*
* 一個簡單範例
*/
test("module without setup/teardown (default)", function() {
    expect(1);
    ok(true);
});
/*
* setup將會先執行,而teardown會最後執行
*/
var state;
module("setup/teardown test", {
    setup: function() {
        state = true;
        ok(true);
    },
    teardown: function() {
        ok(true);
    }
});

test("module with setup/teardown", function() {
    expect(3);
    ok(true);
});

/**
* stop和start運用
*/
module("asyncTest");

// stop呼叫2次,start也必須呼叫兩次
// 才會向下執行下個test

test("sync", 2, function() {
    stop();
    setTimeout(function() {
        ok(true);
        start();
    }, 13);
    stop();
    setTimeout(function() {
        ok(true);
        start();
    }, 125);
});

// 必須呼叫start才會執行下個test

asyncTest("asyncTest", 2, function() {
    ok(true);
    setTimeout(function() {
        state = "done";
        ok(true);
        start();
    }, 13);
});
jQuery mobile

要使用jquery mobile必須要有符合的html定義,在jquery mobile初始化時,它會將頁面上相關的tagattribute,轉成對應的樣式。以下是一個基本的page結構:

<div data-role="page">

    <div data-role="header">
        <h1>Page Title</h1>
    </div>
    <!--   /header   -->

    <div data-role="content">   
        <p>Page content goes here.</p>  
    </div>
    <!--   /content   -->

    <div data-role="footer">
        <h4>Page Footer</h4>
    </div>
    <!--   /footer   -->
</div>
<!-- /page --> 
 
###### 每個tag attribute功能如下:
data-role:每個tag在jquery mobile的type,會根據不同type去設定樣式 。
(ex:page、button....)
 
data-rel:有dialog和back兩個屬性值,dialog根據href對應不同動作,back則回上一頁。
<!-- 跳到id是page2的頁面(利用錨點的特性) -->
<a href="#page2" data-rel="dialog">Open dialog</a>
<!-- 發ajax取得頁面 -->
<a href="index.html" data-rel="dialog">Open dialog</a>
 
data-transition:切換page的效果。(pop、slide、slideup、sildedown、flip、fade)
<a href="index.html" data-transition="pop">I'll pop</a>
 
###### 若是以js動態插入html可使用以下語法:
//
var html = "<a href='index.html' data-role='button'>Link button</a>";
$("#content").append(html)
             .page();


Javascript Storage

storagehtml5的儲存資料的方式之一,主要分為sessionStoragelocalStorage,這兩種儲存方式都只能在相同的domain才能讀取到,sessionStorage只要頁面關掉後,就會釋放儲存的資料,而localStorage是直接儲存在brower

storage的物件成員有:
//設定資料
setItem(key,val);
//取得資料
getItem(key);
//移除資料
removeItem(key,val);
//取得儲存資料的筆數
length;
//利用索引取得資料
key(index)'
//清除所有資料
clear();
其中以下方式功能是一樣的:
sessionStorage.setItem("test","test");
sessionStorage["test"] = "test";
//以上這兩種方式,是相同的效果。

從以上範例可以看出,實際上是把直塞到object裡,所以要是儲存本身物件所擁有的成員,將會加以覆蓋,所以不能用相同名稱。

例如:
sessionStorage.setItem("setItem","test");
//將會出錯
sessionStorage.setItem("test","test");

Javascript Worker

Worker是javascript的thead,只有在支援html5的brower才提供,目前支援最完整的是firefox,firefox可以在Worker理面在使用Worker。Worker目前只提供簡單的傳值、物件、陣列,並沒辦法傳遞function,其中要特別注意的是object,當Worker接收到的是一個object,會與原先的object屬於不同記憶體位址

example:
1
2
3
4
5
6
7
8
9
10
11
12
13
14
15
16
<html>
<head>
</head>
<body>
<script>
var ary = [2,3,4];
var thead = new Worker(&quot;./thead.js&quot;);
thead.onmessage = function(event){
console.log(&quot;new:&quot;+event.data);
console.log(&quot;old:&quot;+ary);
};

thead.postMessage(ary);
</script>

</body>
</html>
index.html

1
2
3
4
5
onmessage = function(event){                                                                                                                         
if(typeof event.data ===&quot;object&quot;)
event.data.push(5);
postMessage(event.data);
};


thead.js
result:
new:2,3,4,5

old:2,3,4

 
Worker的Global成員(指的是上方範例的thead.js):
1
2
3
4
5
6
7
8
9
10
11
12
13
14
15
16
17
//寄送訊息
postMessage(msg);
//關閉thead
close();
//與時間有關的
setTimeout(func,num);
clearTimeout(num);
setInterVal(func,num);
clearInterVal(num);
//目前只有firefox有提供
Worker
//
XMLHttpRequest
//接收訊息的event
onmessage
//引用其他程式
importScripts(url1,url2....);
Worker的物件成員:
1
2
3
4
5
6
7
8
//寄送訊息
postMessage(msg);
//event
onerror
//接收訊息的event
onMessage
//立即關閉thread
terminate()

Html5 Placeholder

placeholder是html5新增的attribute,主要用途是用來設定提示訊息,例如inputtext,你可能會需要設定提示user該輸入的資訊,一般的做法是使用focusblur這兩個event,當submit的時候必須將未填入資訊的欄位清空,而由html5所提供的placeholder,只需要填入應該預設的提示訊息。

以下是一個簡單的example:
<input type="text" name="account" placeholder="請填寫帳號..." />
<textarea name="message" placeholder="請填寫訊息..."></textarea>

如果希望placeholder支援沒有提供的brower,你可使用jsevent去修復它,其中要特別注意的是password這個type,因為它顯示的是特殊符號,所以即使用js也沒有辦法改變它的符號,最簡單的方式,就是使用text去替換,當有填入資料時,就替換成password,資料為空的時候再替換成text,最後一步只要在submit的時候,將未填入資料欄位清空。

jquery的plugin:

javascript history(onpopstate、onhashchange)

historyjavascript中處理上一頁與下一頁的一個object,在ajax中要有換頁的處理效果,而不做頁面切換,可以使用html5所提供的pushStatereplaceState,其中replaceStatepushState功能類似,replaceState最主要是取代目前此筆history中的紀錄,而pushState則是新增一筆

以下是history的function:
/**
* 回上一頁
*/
history.back();
/**
* 下一頁
*/
history.forward();
/**
* 當參數為正數時,為下幾頁,負數則反之。
* @param {int} page
*/
history.go();
/**
* 改變當前頁面的網址(html5)
* @param {*} * 可為任意型態,當事件處發時,會接收到此參數
* @param {String} title
* @param {String} link
*/
history.pushState();
history.replaceState();
/**
* 監聽history可使用onpopstate event
*/
window.onpopstate = function(){
    console.log(arguments);
};

如果brower不支援html5的屬性時,可以使用window.location,它可以前往不同的頁面,接著只要利用"#"(錨點)的特性,就可以達到不換頁的效果,那麼所謂的"#"(錨點)是指此頁面的html的id,當"#"後面不加任何值時,將會跳到頁面最上端,若有找到符合id,則會前往此id的位置,沒找到則不做任何動作。

window.location:
//跳到頁面最上方
window.location = "#";
//比對html的id,若沒此id不做任何動作
window.location = "#history";

使用以上方法時,可以使用兩個onpopstateonhashchange去做監聽,只要執行window.location時,這兩個event都會被呼叫,history.backhistory.forward也會呼叫以上的event,但是如果使用的是pushState就不同了,pushState不會去呼叫任何的event,只有history的紀錄是經由pushState修改過的,切換面頁才會呼叫onpopstate這個event

那麼要是brower都沒有支援以上的監聽事件呢(IE6)?那麼可以使用setTimeout這類的function,去定時檢查link有沒有改變,搭配iframe使用,這樣可以直接由iframe去替換,brower上面的link也不需要改變。

svn server(ubuntu)

1.安裝svn

 sudo apt-get install subversion

2.建立svn repository

svnadmin create svnrepos

3. 建立svn user,開啟svnrepos/conf/svnserve.conf,然後加入以下三行 (開頭不能有空格)

anon-access = none

auth-access = write

password-db = passwd

4. 建立svn使用者和密碼,開啟svnrepos/conf/passwd (開頭不能有空格)

user = password

ex: peter = 123456

5. 啟動svn server

svnserve -d -r svnrepos

-r是svn的root的路徑

6.關閉svn server可以使用

killall svnserve

7.從server抓取資料

svn co svn://xxx.xxx.xxx

svn的port預設是3690有防火牆要記得關掉。

以下有幾個實用的指令:

svn export svn://xxx.xxx.xxx    可以直接將檔案抓下來,不列入版本控制。

svn mv test test1   搬移、重新命名,若直接刪除svn的檔案,再以加入的方式達到重新命名,log將不會保留。