The ngAnimate on angular(1.2.13)

angular的ngAnimate主要是依照不同的Directive,對照不同的class做切換,以下有一張官方提供的對照表:

Directive Supported Animations
ngRepeat enter,leave and move
ngView enter and leave
ngInclude enter and leave
ngSwitch enter and leave
ngIf enter and leave
ngClass add and remove
ngShow & ngHide add and remove (the ng-hide class value)

比較值得注意的是,angular(1.2)以上的版本,是依據directive的目前的status,替換不同的class,它會在每個不同的status加上ng-....的class,如ng-enterng-leave等的。

ngRepeat為例,定義一個html結構:

1
2
3
4
5
<ul>
<li ng-repeat="role in roles" class="demo">
{{role}}
</li>
</ul>

加入一個值到roles

1
$scope.roles.push( "programer" );

則此時會先插入一個ng-enterclass,做初始配置用,接著在插入ng-enter-active的class,改變後的狀態,只有設定transition,這時就會產生動畫效果。

依照element的class名稱,css的配置如下:

1
2
3
4
5
6
7
8
9
10
11
12
13
14
.demo.ng-enter {

-webkit-transition: all 1s linear;
transition: all 1s linear;

/**
* set styles
*/

}
.demo.ng-enter-active {
/**
* set styles
*/

}

若是不支援css3的瀏覽器,則必須自己實作動畫效果:

1
2
3
4
5
6
7
8
9
10
11
12
13
14
15
16
17
18
19
20
21
22
23
24
25
app.animation('.demo', function() {

return {

enter:function( element, done ){

doEffect( done );

return function( cancelled ) {

if ( cancelled ) {

//stopEffect();

} else {

//completeTheAnimation();
}

};
}

};

});

如果要使用到jquery來做特效,需在angular載入之前,先行載入jquery,因為angular會判斷要使用jqueryjqlite,然後再做一些處理。若要使用jquery改變顏色,則需要額外載入jquery-color。另外如果同時用javascript和css實作特效,則css特效會被javascript所覆蓋。

Example

Install

1
bower install angular angular-animate jquery jquery-color

Create a angular app and load a ngAnimate module( app.js ):

1
var app = angular.module('angularNgApp', ["ngAnimate"]);

html:

1
2
3
4
5
6
7
8
9
10
11
12
13
14
15
16
17
18
19
20
21
22
23
24
25
26
27
28
29
30
31
32
33
34
35
36
37
<!DOCTYPE html>
<html>
<head>
<meta charset="UTF-8">
<link rel="stylesheet" href="main.css">
</head>
<body ng-app="angularNgApp">

<div ng-controller="MainCtrl">
<ul>
<li ng-repeat="thing in awesomeThings" class="demo">
{{thing}}
</li>
</ul>
</div>

<!--[if lt IE 9]>
<script src="bower_components/es5-shim/es5-shim.js"></script>
<script src="bower_components/json3/lib/json3.min.js"></script>
<![endif]-->


<!-- bower:js -->
<script src="bower_components/jquery/dist/jquery.js"></script>
<script src="bower_components/jquery-color/jquery.color.js"></script>
<script src="bower_components/angular/angular.js"></script>
<script src="bower_components/angular-animate/angular-animate.js"></script>
<!-- endbower -->

<script src="app.js"></script>
<script src="controller.js"></script>
<!--[if lt IE 9]>
<script src="animation.js"></script>
<![endif]-->


</body>
</html>

main.css:

1
2
3
4
5
6
7
8
9
10
.demo.ng-enter {

-webkit-transition: all 1s linear;
transition: all 1s linear;
background: #000;
}

.demo.ng-enter-active {
background: #fc3;
}

controller.js:

1
2
3
4
5
6
7
8
9
10
11
12
13
14
15
app.controller('MainCtrl', function ( $scope, $timeout ) {

$scope.awesomeThings = [
'HTML5 Boilerplate',
'AngularJS',
'Karma'
];

$timeout( function(){

$scope.awesomeThings.push("123");

}, 2200);

});

animation.js:

1
2
3
4
5
6
7
8
9
10
11
12
13
14
15
16
17
18
19
20
21
app.animation('.demo', function() {

return {
enter : function( element, done ) {

element.animate({
'background-color': 'red'
}, done);

return function( cancelled ) {

if(cancelled) {
//stopTheAnimation();
}
else {
//completeTheAnimation();
}
}
}
};
});

Aws s3 on python

在python要使用aws的s3,官方建議是透過boto這套libs。

Dependency

  • boto

Install

1
sudo pip install boto

Usage

Creating a Connection:

設定access和secret key,其中host為上傳s3位置。

1
2
3
from boto.s3.connection import S3Connection

conn = S3Connection('<aws access key>', '<aws secret key>', host = 's3.amazonaws.com' )

Getting a bucket:

如果你已經在s3的頁面建立好bucket了,可以直接使用get_bucket:

1
bucket = conn.get_bucket( 'mybucket' )

或者自己建立:

1
bucket = conn.create_bucket('mybucket')

Storing Data:

使用key去建立一個檔案,其中k.key這個值,假設有多層folder直接設定在此:

1
2
3
4
5
from boto.s3.key import Key

k = Key(bucket)
k.key = 'folder/test.txt'
k.set_contents_from_string('This is a test of S3')

之後只要在重新連線,透過k.get_contents_as_string()就可以取得到資料了。

如果要上傳一個file的話,可透過set_contents_from_filename,會將你local端的foo.jpg上傳至s3:

1
k.set_contents_from_filename('foo.jpg')

要下載則是採用get_contents_to_filename

1
k.get_contents_to_filename('bar.jpg')

最後如果想透過變數去儲存至s3,一樣使用set_contents_from_string

1
2
3
4
5
6
7
f = open( "foo.jpg", "rb" )

data = f.read()

f.close()

k.set_contents_from_string( data )

以上這些方式,需檢查k.key是否對應好s3上面的路徑。

Flask-Babel example

flask的support多國語言的方式,與python本身的gettext方式相同,都是去parse檔案裡頭含有gettext這類的語法,然後在將檔案轉成.po檔,去編輯相關的對應文字,接著放在相對應的folder,例如zhen的字眼,最後在轉成.mo,實際執行gettext會讀取.mo

Demo screenshot

Demo image

假設預設的配置如下:

1
2
3
4
5
6
7
.
├── app.py
├── babel.cfg
├── mysettings.cfg
├── README.md
└─── templates
   └── index.html

mysettings.cfg設定預設的語系(在多國語系找不到時,將會預設英文):

1
BABEL_DEFAULT_LOCALE="en"

透過from_pyfile載入:

1
app.config.from_pyfile('mysettings.cfg')

預設web接受的語系:

1
2
3
4
5
6
7
8
9
10
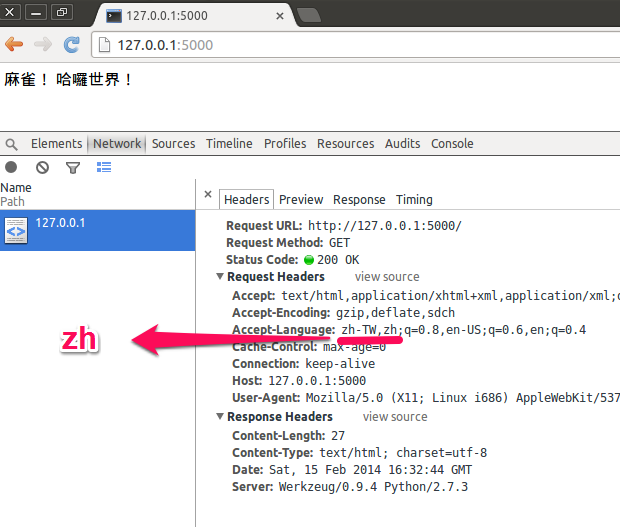
@babel.localeselector
def get_locale():
# if a user is logged in, use the locale from the user settings
user = getattr(g, 'user', None)
if user is not None:
return user.locale
# otherwise try to guess the language from the user accept
# header the browser transmits. We support de/fr/en in this
# example. The best match wins.
return request.accept_languages.best_match(['en','zh'])

產生.po和.mo檔

babel.cfg設定要parse的路徑:

1
2
3
[python: **.py]  
[jinja2: **/templates/**.html]
extensions=jinja2.ext.autoescape,jinja2.ext.with_

接著只要在專案的根目錄執行以下command,就會取得messages.pot檔案:

1
pybabel extract -F babel.cfg -o messages.pot .

編輯好message.mo,初始化語系路徑以及設定語系:

1
pybabel init -i messages.pot -d translations -l zh

產生translations/de/LC_MESSAGES/messages.po此路徑。

最後在將translations底下的.po檔案轉換成.mo檔即可:

1
pybabel compile -d translations

完成範例

Capture a image block on angular

最近需要使用到一個圖片切割的工具,在angular的package中找了一下,沒有找到比較合適,因為只需要支援html5的瀏覽器,就實作了一個間單的工具(ngImageEditor)。

以下是demo實際執行的畫面:

explain

使用與安裝:

Demo

demo

Install

1
bower install ngImageEditor

Support

  • IE9+
  • chrome
  • firefox

設定editor的attributes

1
<div img-src="imgSrc" ng-image-editor="imageEditor" selected="selected"></div>

載入要切割的圖片

1
$scope.imgSrc='/images/head.jpeg';

設定切割的區塊位置及大小

1
$scope.selected = {width:150,height:150,top:0,left:0};

將區塊大小的image取出

1
$scope.imageEditor.toDataURL();

實作方式主要是透過canvas作轉換,至於cross domain,必須是同個domain,否則要從server上設定,允許哪個domain可以存取作編輯。

在server上設定你要跨網域的domain:

1
Access-Control-Allow-Origin: http://your.domain.com

在javascript中呼叫img.src之前,加入以下設定:

1
img.crossOrigin = "Anonymous";

可參考這篇

jquery detach on angular directive

在angular中會有基本的jquery-lite,也就是angular.element,當在include angular之前,就先include jquery,此時angular的jquery-lite,就會被自動替換成jquery。

替換angular.element的source code如下:

1
2
3
4
5
6
7
8
9
10
11
12
13
14
15
16
17
18
19
20
21
22
23
function bindJQuery() {
// bind to jQuery if present;
jQuery = window.jQuery;
// reset to jQuery or default to us.
if (jQuery) {
jqLite = jQuery;
extend(jQuery.fn, {
scope: JQLitePrototype.scope,
isolateScope: JQLitePrototype.isolateScope,
controller: JQLitePrototype.controller,
injector: JQLitePrototype.injector,
inheritedData: JQLitePrototype.inheritedData
});
// Method signature:
// jqLitePatchJQueryRemove(name, dispatchThis, filterElems, getterIfNoArguments)
jqLitePatchJQueryRemove('remove', true, true, false);
jqLitePatchJQueryRemove('empty', false, false, false);
jqLitePatchJQueryRemove('html', false, false, true);
} else {
jqLite = JQLite;
}
angular.element = jqLite;
}

另外一個需要注意的地方就是jqLitePatchJQueryRemove,會將jquery原生的function,多經過一層處理,處理完在呼叫jquery的function

jqLitePatchJQueryRemove的source如下:

1
2
3
4
5
6
7
8
9
10
11
12
13
14
15
16
17
18
19
20
21
22
23
24
25
26
27
28
29
30
31
32
33
34
function jqLitePatchJQueryRemove(name, dispatchThis, filterElems, getterIfNoArguments) {     
var originalJqFn = jQuery.fn[name];
originalJqFn = originalJqFn.$original || originalJqFn;
removePatch.$original = originalJqFn;
jQuery.fn[name] = removePatch;

function removePatch(param) {
// jshint -W040
var list = filterElems && param ? [this.filter(param)] : [this],
fireEvent = dispatchThis,
set, setIndex, setLength,
element, childIndex, childLength, children;

if (!getterIfNoArguments || param != null) {
while(list.length) {
set = list.shift();
for(setIndex = 0, setLength = set.length; setIndex < setLength; setIndex++) {
element = jqLite(set[setIndex]);
if (fireEvent) {
element.triggerHandler('$destroy');
} else {
fireEvent = !fireEvent;
}
for(childIndex = 0, childLength = (children = element.children()).length;
childIndex < childLength;
childIndex++) {
list.push(jQuery(children[childIndex]));
}
}
}
}
return originalJqFn.apply(this, arguments);
}
}

其中element.triggerHandler('$destroy')會告知angular底下的transcludedScope,這個element已經被摧毀了,所以會導致,$element.detach的時候,transcludedScope無法被更新。element.triggerHandler('$destroy')的監聽event可以參考createBoundTranscludeFn這個function,會有下這段code去監聽:

1
clone.on('$destroy', bind(transcludedScope, transcludedScope.$destroy));

jqLitePatchJQueryRemove只替換removeemptyhtml,而沒有替換detach,使用detach卻會影響scope,真正原因要找jquery的source code。

因為detach間接呼叫了remove:

1
2
3
detach: function( selector ) {
return this.remove( selector, true );
}

Example(1.2.7):

由此可知,只要scope尚未ready時,呼叫detach就不會中斷scope的更新。若要讓directive的scope正常運作,可用以下方式:

  1. 不使用transclude
  2. 不在scope ready中,使用detach
  3. 使用原生api
  4. 最後一種方式,jquery在angular之後include

如果不是這麼需要使用到jquery,建議就不要include了,當然jquery也提供很多方便的功能,依照project需求自己評估吧!

Copy canvas on html5

要複製整張canvas,可以使用getImageDataputImageData。透過getImageData這個method,將整張canvas的資料取出來,在經由putImageData將資料覆蓋上去。

Copy:

取得整張canvas的data:

1
2
var ctx = canvas.getContext("2d");
var imageData = ctx.getImageData( 0, 0, canvas.width, canvas.height );

在將imageData的資料,塞到copyCanvas對應的data區塊:(在這預設兩張canvas大小都相同)

1
2
var cctx = copyCanvas.getContext("2d");
cctx.putImageData( imageData, 0 ,0 );

這樣你就會看到第一張的canvas,完整的copy到第二張上面。

Example:

最初的兩張canvas

style

1
2
3
canvas {                     
border:1px solid gray;
}

html

1
2
<canvas id="main" width="300" height="200"></canvas>
<canvas id="copy" width="300" height="200"></canvas>

javascript

1
2
3
4
5
6
7
8
9
10
11
//left canvas
var canvas = document.querySelector( "#main" );
var ctx = canvas.getContext("2d");
ctx.fillStyle="#FF0000";
ctx.fillRect(0,0,150,75);

//right canvas
var copy = document.querySelector( "#copy" );
var cctx = copy.getContext("2d");
cctx.fillStyle="#FF00FF";
cctx.fillRect(20,20,150,75);
  • 把左邊的canvas透過drawImage畫到右邊的canvas:

    1
    cctx.drawImage( canvas, 0 ,0 );

    透過drawImage畫到右邊canvas

  • 將左邊的canvas的資料,透過putImageData取代右邊canvas資料:

    1
    2
    var imageData = ctx.getImageData( 0, 0, canvas.width, canvas.height );
    cctx.putImageData( imageData, 0 ,0 );

    透過putImageData畫到右邊canvas

如果使用drawImage,透明部份將不會畫上去,沒辦法完整複製,而putImageData,則是完全取代某區塊的的bytes。

angularjs timepicker on bootstrap3

angularjs的ui-bootstrap,套用至bootstrap3,目前只能支援部份的元件。所以就自己實作了一個timepicker的元件,如下:

Dependency

  • boostrap3
  • angularjs

Support

  • IE8+
  • chrome
  • firefox

Install

用bower install

1
bower install ngTimepickerForBs3

Usage

include所需要的scripts和styles:

1
2
<link rel="stylesheet" href="bower_components/ngTimepickerForBs3/angularjs-timepicker.css"/>
<script type="text/javascript" src="bower_components/ngTimepickerForBs3/angularjs-timepicker.js"></script>

設定timepicker的model和初始值;

1
<div ng-timepicker-for-bs3 ng-model="test" ng-init="test={hours:23,mins:59}"></div>

載入ngTimepickerForBs3的module:

1
2
3
angular.module( "app", [
"ngTimepickerForBs3"
]);

Controller ( Yii Framework )

在mvc的controller,主要是處理邏輯部份,會依照不同的path、參數、method…等,決定要處理的資料,以及要回傳什麼資訊給user。在Yii的controller都繼承至CController,需要導向哪個action,會在controller裡面設定完成。

  1. Route
  2. Action
  3. Filter

Route

在Yii裡的程式進入點,都是透過project/index.php這一隻程式,在根據webApp的confifg,決定預設執行哪支controller,以及在project/protected/controllers對應的path。

例如在project/index.php裡,會指定使用哪個config:

1
2
3
$config=dirname(__FILE__).'/protected/config/main.php';

Yii::createWebApplication($config)->run();

然後在main.php的config中,可以透過defaultController指定預設controller:

1
2
3
4
return Array(
'defaultController'=>'post',
//doSomething
);

意思就是當path為根目錄時,會導向至PostController,例如url為:

1
http://localhost/

與下面url相同,會藉由r這個參數對照contoller/action(當action未指定時,預設執行actionIndex這function,也可透過defaultAction自訂):

1
http://localhost/index.php?r=post/index

對應的project/protected/controllers/PostController

1
2
3
4
5
6
class PostController extends CController {

public function actionIndex(){
//doSomething...
}
}

如果想自訂controller對應class的路徑,可使用controllerMap


自訂url對應controller和action

使用自訂的url規則,去對應controller和action,可以修改webapp的config:

1
2
3
4
5
6
7
8
9
10
11
return array(
'urlManager'=>array(
'urlFormat'=>'path',
'rules'=>array(
'post/<id:\d+>/<title:.*?>'=>'post/view',
'posts/<tag:.*?>'=>'post/index',
'<controller:\w+>/<action:\w+>'=>'<controller>/<action>',
),
),
//doSomething...
);

nginx的config設定,將除了靜態檔案以外的request,全部導向至index.php:

1
2
3
4
5
6
7
8
9
10
11
12
13
14
15
16
17
18
19
20
21
22
23
24
25
26
server {

listen 80 default;
server_name localhost;

access_log /var/log/nginx/localhost.access.log;

location ~* \.(js|png|jpg|gif|css|html)$ {

root /home/user/example/yii_example/yii/demos/blog;
}

location / {

index index.php index.html index.htm;
rewrite ^(.*) /index.php last;
}

location ~ \.php$ {
fastcgi_pass 127.0.0.1:9000;
fastcgi_index index.php;
#fastcgi_param SCRIPT_FILENAME /tmp$fastcgi_script_name;
fastcgi_param SCRIPT_FILENAME /home/user/example/yii_example/yii/demos/blog$fastcgi_script_name;
include fastcgi_params;
}
}

Action

yii根據path導向至不同的controller,在透過controller指派action去處理。一般來說action可以直接寫在controller裡,也可以透過繼承CAction的方式,在controller定義此class。

在controller裡面定義action,有兩種方式:

  • 只需要讓function名稱的開頭為action,在加上action的名稱即可。

    1
    2
    3
    4
    5
    6
    7
    8
    9
    10
    11
    12
    13
    14
    15
    16
    17
    18
    19
    class PostController extends CController {

    /**
    * path為
    /index.php?r=post
    /index.php?r=post/index
    **/
    public function actionIndex(){

    }

    /**
    * path為
    /index.php?r=post/create
    **/
    public function actionCreate(){

    }
    }
  • 透過actions這個function,回傳定義好的config,對應不同CAction

    1
    2
    3
    4
    5
    6
    7
    8
    9
    10
    11
    12
    13
    14
    15
    16
    17
    class PostController extends CController {

    public function actions()
    {
    return array(
    // page action renders "static" pages stored under 'protected/views/site/pages'
    // They can be accessed via: index.php?r=site/page&view=FileName
    'page'=>array(
    'class'=>'CViewAction',
    ),
    // file path under 'protected/controllers/post/SayHelloAction'
    'sayhello'=>array(
    'class'=>'application.controllers.post.SayHelloAction',
    ),
    );
    }
    }

CAction

繼承至CAction的方式,如下:

1
2
3
4
5
6
7
class SayHelloAction extends CAction {

public function run()
{
//doSomething...
}
}

yii也提供一些現成的action可以使用,像是:

  • CCaptchaAction
    自動產生驗證碼,需要安裝php5-gd。

  • CViewAction
    可透過view這個參數,導向到不同頁面,而不需要針對每個頁面寫一個action。

Filter

yii的filter與action在controller的配置方式差不多,同樣可以在controller自訂filter的function,也可以class的方式繼承CFilter

在controller寫filter方式:

1
2
3
4
public function filterAccessControl($filterChain)
{
// call $filterChain->run() to continue filter and action execution
}

如果呼叫$filterChain->run(),將會繼續往下執行下個filter和action,反則會中斷掉。

與action在controller宣告不同的是,filter的套用,必須在controller裡定義filters這個function,回傳定義的config:

1
2
3
4
5
6
public function filters(){

return array(
"accessControl",
);
}

上面這種方式,將會套用此controller的所有action,若要套用個別action,如下:

1
2
3
4
5
6
7
public function filters(){

//將filter套用至edit和create action
return array(
"accessControl + edit, create",
);
}

如果把+替換成-,指的就是除了edit和create這兩個不套用filter,剩下全部套用。

CFilter

CFilter將會透過preFilter這個function,決定要繼續向下執行或者停止,而postFilter則是會在preFilter向下執行時,才會去呼叫。

定義一個filter:

1
2
3
4
5
6
7
8
9
10
11
12
13
14
15
16
17
class PerformanceFilter extends CFilter
{

public $unit;

protected function preFilter($filterChain)
{
// logic being applied before the action is executed
//print $unit;
return true; // false if the action should not be executed
}

protected function postFilter($filterChain)
{
// logic being applied after the action is executed
}
}

在controller中使用PerformanceFilter:

1
2
3
4
5
6
7
8
9
10
11
12
13
class PostController extends CController
{
......
public function filters()
{
return array(
array(
'application.filters.PerformanceFilter - edit, create',
'unit'=>'second',
),
);
}
}

filter第二個傳入參數unit,將會設定PerformanceFilter的unit值。所以除了第一個參數,會設定filter,之後的參數都會對應filter的public屬性。

Getting Started with the Yii Framework

REQUIREMENTS

實際需要使用到的:

文章中需要使用到:

INSTALL

在終端機上執行以下command:

1
2
sudo apt-get update
sudo apt-get install php5-cgi php5-fpm php5-sqlite php5-mysql nginx git

QUICK START

抓取yii的source:

1
git clone https://github.com/yiisoft/yii.git

建立一個webapp:

1
2
mkdir webapp
./yii/framework/yiic webapp webapp/

建立完後的目錄結構:

1
2
3
4
5
6
7
8
9
10
11
12
13
14
15
16
17
18
19
20
21
22
23
24
25
26
27
28
29
30
31
.
├── assets
├── css
│   ├── bg.gif
│   ├── form.css
│   ├── ie.css
│   ├── main.css
│   ├── print.css
│   └── screen.css
├── images
├── index.php
├── index-test.php
├── protected
│   ├── commands
│   ├── components
│   ├── config
│   ├── controllers
│   ├── data
│   ├── extensions
│   ├── messages
│   ├── migrations
│   ├── models
│   ├── runtime
│   ├── tests
│   ├── vendor
│   ├── views
│   ├── yiic
│   ├── yiic.bat
│   └── yiic.php
└── themes
└── classic

其中assets、runtime和data,必須要讓www-data(nginx、apache)有讀、寫和執行的功能,可使用設定群組的方式,或者執行chmod -R 777 assets protected/runtime protected/data

打開nginx config:

1
sudo vi /etc/nginx/sites-enabled/default

修改以下這兩個location,設定你的webapp位置和設定fastcgi連接到php-fpm:

1
2
3
4
5
6
7
8
9
10
11
12
location / { 
root /tmp/webapp;
index index.html index.htm index.php;
}

location ~ \.php$ {
#fastcgi_pass 127.0.0.1:9000;
fastcgi_pass unix:/var/run/php5-fpm.sock;
fastcgi_index index.php;
fastcgi_param SCRIPT_FILENAME /tmp/webapp$fastcgi_script_name;
include /etc/nginx/fastcgi_params;
}

如果使用的是nginx和php-fpm,請檢查php-fpm的listen設定,對應上面的fastcgi_pass。檔案位置在/etc/php5/fpm/pool.d/www.conf

設定完之後,重開nginx:

1
2
3
4
sudo /etc/init.d/nginx restart

#若是php-fpm的config的有被修改到,需重啟fpm
sudo /etc/init.d/php5-fpm restart

在瀏覽上打開http://localhost/,就可以看到剛剛佈署完的結果了。

在Titanium HTTPClient使用cookie與header

titanium內建的HTTPClient本身就有實作cookie的功能,使用起來跟瀏覽器一樣,會自動解析response header,及發送以設定的cookie,而不需要額外去解析header,和添加request的header,要清除cookie可以使用clearCookies,若要在client端設定cookie,可以使用setRequestHeader

清除與設定cookie

建立一個HTTPClient:

1
var client = Ti.Network.createHTTPClient({});

指定清除某個網域底下的cookie:

1
client.clearCookies( "www.example.com" );

由client設定cookie:

1
client.setRequestHeader( "cookie", "name=sparrow;" );

使用cookie常見問題

通常cookie能不能被存取,會依照expires、path、domain、HttpOnly、secure這幾項辨識:

  • expires : cookie的時效性,當時間超過expires設定的日期,這個cookie將會被捨棄。

    1
    expires=Sat, 17-Oct-2015 14:11:09 GMT;
  • path : 在domain下,cookie允許存取的路徑。

    1
    path=/;
  • domain : cookie允許存取的domain。

    1
    2
    3
    4
    domain=.google.com.tw;
    最前面的.指得是子網域皆可存取,例如:
    www.google.com.tw
    ad.google.com.tw
  • HttpOnly : 在瀏覽器下看到這個屬性時,只允許server端操作此cookie,換句話說client雖然存此cookie,卻無權操作,可防止透過xss將cookie偷走。

    1
    HttpOnly
  • secure :只允許在https上操作此cookie,在一般http接無法存取。

    1
    secure;

如果有用到nginx、apache這類的server去做proxy,需要檢查path或domain,才不會遇到cookie無效的狀況。

解析response的header

在android的device,如果想要取得header的內容可以使用allResponseHeaders,雖然titanium有提供getResponseHeader的功能,實際使用過都無法取得到值。

在onload取值:

1
2
3
4
client.onload = function(){

Ti.API.info( client.allResponseHeaders );
};

如果你想取得一個header的json,可以實作一個類似這種function:

1
2
3
4
5
6
7
8
9
10
11
12
13
14
15
16
17
18
19
20
21
22
23
24
25
26
27
28
29
30
31
32
33
34
35
36
37
38
39
40
41

/**
* @param {*} ary
* @type boolean
*/
var isArray = function( ary ){

return Object.prototype.toString.call( ary ) === "[object Array]";
};

/**
* @param {String} allResHeaders
* @type Object
*/
var getHeaders = function( allResHeaders ){

var result = {},

headerStrs = allResHeaders.split( "\n" );

for ( var index in headerStrs ) {

if ( headerStrs[index] ) {

var header = result[index].split( ":", 2 ),

name = header[0].toLowerCase(),

value = header[1];

if ( result[name] && !isArray( result[name] ) ) result[name] = [ result[name], value];

else if ( isArray( result[name] ) ) result[name].push( value );

else result[name] = value;

}
}

return result;
};

透過getHeaders取值:

1
2
var headers = getHeaders( client.allResponseHeaders );
Ti.API.info( headers );