Titanium command line

titanium的環境都安裝好之後,就可以找到~/.titanium這路徑,然後在.bashrc加上以下配置。

1
alias titanium.py=$HOME/.titanium/mobilesdk/linux/3.0.0.GA/titanium.py

接著執行:

1
source .bashrc

然後建立一個project:

1
titanium.py create --platform=android --android=/path/to/android-sdk --id=com.mycompany.myApp --name=myApp

會建立出以下檔案:

1
2
3
4
5
6
7
8
9
10
11
12
13
14
15
16
17
18
19
20
21
22
23
.
|-- build
| `-- android
| |-- AndroidManifest.xml
| |-- assets
| |-- bin
| |-- default.properties
| |-- gen
| |-- lib
| |-- res
| `-- src
|-- LICENSE
|-- manifest
|-- README
|-- Resources
| |-- android
| | |-- appicon.png
| | |-- default.png
| | `-- images
| |-- app.js
| |-- KS_nav_ui.png
| `-- KS_nav_views.png
`-- tiapp.xml

啟動android的模擬器:

1
titanium.py emulator --platform=android --android=/path/to/android-sdk

如果需要使用到google api,可等待建立後,至avd調整。

最後在把project run在模擬器上:

1
titanium.py run --platform=android --android=/path/to/android-sdk

可參考官方文件

Backbone.js emulateHTTP and emulateJSON

Backbone.emulateHTTP值為true時,會模擬restful的動作,將delete和put(update) method,全部都用post method代替,然後添加X-HTTP-Method-Override的header和_method的參數。

Example如下:

先建立一個Book Model。

Backbone.emulateHTTP = true;
Backbone.emulateJSON = true;
var Book = Backbone.Model.extend({
  urlRoot:"/books"     
});                      
var book = new Book({id:32});

執行save時,會發送request到server。(在backbone的model id有值的時候,save會是update功能,反之則為create。)

                                                                                                                                                                                            
book.save({name:"Tom"}); 

發送request到server端的header,會添加以下這段:

X-HTTP-Method-Override:PUT

Backbone.emulateJSON為true時,request的content-type會設定為application/x-www-form-urlencoded,傳遞到server參數如下:

model={"id":32,"name":"Tom"}&_method=PUT

Backbone.emulateJSON為false時,request的content-type會設定為application/json,傳遞到server參數如下:

{"id":32,"name":"Tom"}

所以當request的content-type不是application/json時,使用emulateHTTP,會多傳一個_method的參數到server端,可供server辨識。

javascript event偵錯-Visual Event 2

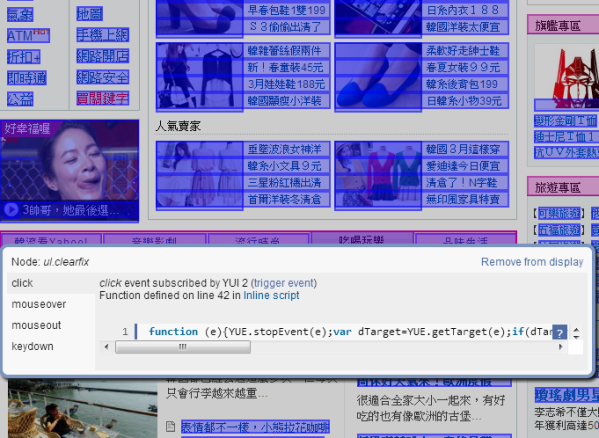
Visual Event會透過將javascript語法,注入到頁面的方式,取得每個element所綁定的事件。如果是常常include很多library時,或者寫一些比較複雜ui,可透Visual Event檢視綁定element上的event正不正確,方便除錯。

執行流程如下:

將以下script,加入到書籤的網址欄位:

javascript:(function()%20{var%20url%20=%20'//www.sprymedia.co.uk/VisualEvent/VisualEvent_Loader.js';if(%20typeof%20VisualEvent!='undefined'%20)%20{if%20(%20VisualEvent.instance%20!==%20null%20)%20{VisualEvent.close();}else%20{new%20VisualEvent();}}else%20{var%20n=document.createElement('script');n.setAttribute('language','JavaScript');n.setAttribute('src',url+'?rand='+new%20Date().getTime());document.body.appendChild(n);}})();

然後在選擇你要測試的頁面,執行剛剛加入的書籤,或將以上script貼到網址列,再按enter,就能偵測到綁定的event:

目前support的library如下:

  • DOM 0 events
  • jQuery 1.2+
  • YUI 2
  • MooTools 1.2+
  • Prototype 1.6+
  • Glow
  • ExtJS 4.0.x

注入的方式其實就是透過書籤、網址列可以執行javascript特性,當你點擊書籤時,就會執行script,將程式load當前頁面。在網址列執行script範例,如下:

//將以下程式碼貼到網址列按enter,就可以執行js語法
javascript:alert(3);

至於偵測event的實作,大致上是將每個element上的attribute掃過,還有針對不同library綁定event方式去處理,最後將ui呈現畫面上。

Camera Snapshot(getUserMedia)

html5有提供一個可以取得視訊的api,使用navigator.getUserMedia,可以取得鏡頭的影像及聲音,example如下。

html:

<!DOCTYPE HTML>    
<html lang="en">   
<head>             
    <meta charset="UTF-8">
    <title></title>
</head>            
<body>             
    <video autoplay></video>
    <img src="">   
    <canvas style="display:none;"></canvas>     
    <script type="text/javascript" src="cameraSnapshot.js"></script>
</body>            
</html>         

cameraSnapshot.js:

(function(){     
    navigator.getUserMedia = navigator.getUserMedia || 
                             navigator.webkitGetUserMedia || 
                             navigator.mozGetUserMedia || 
                             navigator.msGetUserMedia;

    var video = document.querySelector('video');
    var canvas = document.querySelector('canvas');
    var ctx = canvas.getContext('2d');
    var localMediaStream = null;
    var img = document.querySelector('img');

    function snapshot() {
      if (localMediaStream) {
        canvas.width = img.width = video.clientWidth;
        canvas.height = img.height = video.clientHeight;
        ctx.drawImage(video, 0, 0); 
        img.src = canvas.toDataURL('image/webp');
      }             
    }               

    video.addEventListener('click', snapshot, false);

    if( navigator.getUserMedia ){
        navigator.getUserMedia({video: true}, function(stream) {
        video.src = window.URL.createObjectURL(stream);
        localMediaStream = stream;

        },function( error ){
            alert("User denied access to their camera!");  
        });           
    }else{         
        alert("The browser is not support");
    }               

})();           

這個範例主要是使用getUserMedia取得user的授權,將會回傳user所選的鏡頭串流,接著觸發video的click event,把目前video的畫面,繪製在canvas,在轉換成image。支援的瀏覽器

HTML5 Cache Manifest

當網路無法使用的時候,html5提供一個可以預先儲存到本機端,讓沒有網路的情況也可以使用。當需要更新時,只要去修改manifest的版本,browser就會自動做update動作。

如果是使用nginx需要在mime.types,加入以下設定:

text/cache-manifest      mf manifest;

以上動作只是針對server對browser需要吐回header,讓browser做解析,例如是php、java、node.js,這類型的語言,也可以直接在header自行加入。

html example:

<!DOCTYPE HTML>        
<html lang="en" manifest="test.manifest">       
<head>                 
    <meta charset="UTF-8">
    <title></title> 
</head>                
<body>                 
    <script type="text/javascript" src="test.js"></script>
    <script type="text/javascript">
        test.hello();
    </script>
    hello
</body>                
</html>    

test.manifest:

CACHE MANIFEST

# VERSION 0.1 

#需要cache path
CACHE:
test.js

#需要連線至網路的path
NETWORK:

#找不到path,將去替換path
FALLBACK: 

以上這種作法,會有一個問題,如果當page不是靜態的,而是要做成動態方式,page會預先被cache住,即時在manifest裡面的network設定,也還是有一樣的情況。網路上查到可以使用iframe去內嵌入一個cache.html,但是這幫助並不大,實際頁面上讀取的static檔案,還是會重新去讀取,會與iframe裡面的cache沒有相關,反而會覆蓋iframe cache裡面的檔案(路徑相同,ex:test.js)。

如果只是要cache js的話,那目前有個作法,可以解決這個問題,但不是一個好的解決方式,如下。

index html:

<!DOCTYPE HTML>        
<html lang="en">       
<head>                 
    <meta charset="UTF-8">
    <title></title> 
</head>                
<body>                 

    <script type="text/javascript">
        function onload(){
            document.querySelectorAll("iframe")[0].contentWindow.test.hello();        
        }
    </script>
    <iframe src="cache.html" style="display:none;" ></iframe>
    <script>
          document.querySelectorAll("iframe")[0].onload = onload;
    </script>
</body>                
</html>     

cache html:

<!DOCTYPE HTML>                                    
<html lang="en" manifest="test.manifest">          
<head>                                             
    <meta charset="UTF-8">                         
    <title></title>                                
</head>                                            
<body>                                             
    <script type="text/javascript" src="test.js"></script>

</body>                                  
</html>   

test.js:

test = { 
    hello:function(){
        console.log("hello");
    }   
};

test.manifest:

CACHE MANIFEST

# VERSION 0.1 

#
CACHE:
test.js

#
NETWORK:

#
FALLBACK:

以上作法,主要是利用iframe讀取到的cache script,在從主要頁面對iframe抓取相關javascript object。

requirejs clear cache

當每次需要把code佈署至production,又希望user不要因為瀏覽器的機制讀取到舊的code,那麼最簡單方式,就是改變靜態檔案的連結,只要連結不同,瀏覽器就會視為不同檔案。

第一種方法就是讓每次佈署到production時,先替換靜態檔案的連結,如果使用ruby on rails,它能直接將靜態檔案去做merge,和將連結轉成亂碼,可以參考icook頁面上的source code。

另一種方式就是直接將js、css這些靜態檔案,直接經由頁面上吐出來,這種方式request的數量會大幅減低,讀取速度也會更快,例如yahoogoogle

那如果是使用requirejs,又不想使用以上方法或者自行在每個script加參數,那麼可以使用以下方式:

var require = {
    urlArgs: "bust=v1"
};

官方有建議使用var的方式宣告require,而不要使用window.require方式,因為在老舊的IE瀏覽器,會有可能會出問題。

(相信之前有測過IE6和常常使用共用同一個namespace,並且有寫得很嚴謹的人,應該都有碰過這奇怪bug。)

Modernizr

modernizr是一個判斷瀏覽器支援性的JavaScript library ,比起以往使用userAgent判斷不同瀏覽器的支援性,使用modernizr相對更直覺方便。

支援性的example:

//是否支援css3動畫的效果
if( Modernizr.csstransitions ){

}

//是否支援touch event
if( Modernizr.touch ){

}

在css3如transform屬性,在不同瀏覽器上,都會有不同屬性名稱,可以用prefixed來判斷:

//如果是chrome則會顯示WebkitTransform
console.log( Modernizr.prefixed('transform') );

如果要判斷css的media query,目前是否符合那段判斷,可以使用Modernizr.mq

Modernizr.mq('(min-width: 0px)');

判斷event可以採用hasEvent:

//是否有縮放event(iphone、ipad)
Modernizr.hasEvent('gesturestart', elem) ;

如果要自己撰寫測試的判斷,可以使用addTest

//官方已實作
Modernizr.addTest('canvas', function() {
  var elem = document.createElement('canvas');
  return !!(elem.getContext && elem.getContext('2d'));
});

判斷有沒有此css屬性:

Modernizr.testProp('pointerEvents')

其他method的使用方式和詳細文件,可以參考官方的doc

Backbone history

backbone的router,主要用途是可以依照不同url,做不同的動作,很適合拿來做動態頁面切換,像是拿來製作mobile web,就滿適合的,使用到的技術有兩種,一個是利用錨點(#)的特性,另一個則是使用html5的pushState,達到不換頁的效果。

以下是官方的範例:

var Workspace = Backbone.Router.extend({

  routes: {
    "help":                 "help",    // #help
    "search/:query":        "search",  // #search/kiwis
    "search/:query/p:page": "search"   // #search/kiwis/p7
  },

  help: function() {
    doSomething("help");
  },

  search: function(query, page) {
    doSomething( query, page );
  }

});

定義好router要做的事情後,接著把router實體化:

new Workspace()

最後執行start,router就能開始運作了:

/**
* 開始使用router
* @param {String} root 指的是起始url
* @param {object} opts.pustState 就是html的pushState,如果為true就不會採用錨點方式,而是直接更動url,讓web看到在不同頁面的url
*/
Backbone.history.start({root:"/"});

/**
* 更動web上的location url
* @param {String} url
* @param {Object} opts.trigger 為true,則會觸發router event,如果為false,只會更動location url
* @param {Object} opts.replace 為true,會取代目前這筆的history,pushState則是新增一筆
*/
Backbone.history.navigate("/search",{trigger:true});

用錨點的優勢,支援舊有的瀏覽器(backbone都處理好了,即時不支援pushState,也會採用錨點方式),也可以直接利用a這個element,直接觸發event,而不需在另外寫script去bind event。如下:

<a href="#search">search</a>

利用pushState想達到跟錨點一樣的效果,可以如下:

$(document.body).on( "click", "a.history-go" ,function( event ){
    Backbone.history.navigate( $(this).attr("href").replace("#","") ,{trigger:true} );
    event.preventDefault();
}).on( "click", "a.history-back" );

接著只要在a這個Element,加入class,即可達到一樣效果:

<a class="history-go" href="#search">search</a><br>
<a class="history-back">back</a>
mobile web debug tool(jsconsole)

如果要在androidbrowser debug,最早期的方式,是使用adb logcat然後過濾掉其他訊息,只顯示browser的log,而ios上的Safari,則是可在設定,直接在mobile上觀看log(在mac上,可以使用類似chrome同樣的除錯介面)。但是這種除錯方式不易,只能單方面看到browser訊息,並沒辦法直接從pc上對瀏覽器下指令,而jsconsole剛好可以解決這個問題。

jsconsole提供了一個console page(jsconsole.com),會產出一個listen key,同時test page(開發者寫得測試頁面)也會include一隻script,在透過server讓test pageconsole page溝通。

step 1 在console page輸入以下code:

:listen

server會回傳

Creating connection...
Connected to "2A049E81-520B-4074-BB06-45BE8ADBE9E1"
<script src="http://jsconsole.com/remote.js?2A049E81-520B-4074-BB06-45BE8ADBE9E1"></script>

step 2 將回傳的script貼到test page:

<html>
  <head>
     <script src="http://jsconsole.com/remote.js?2A049E81-520B-4074-BB06-45BE8ADBE9E1"></script>
  </head>
<body>

</body>
</html>

這樣就配置完成,可以直接在console page,輸入javascript,也能同時接收test page裡的console.log。

step 3 在console page輸入:

alert("test");

就會看到在mobile上,跑出訊息視窗。技術猜測應該是使用long pollingserver push之類技術。


mobile chrome debug:

那如果使用chrome browser,可以直接在mobile選項,點選設定→開發人員工具→啟用usb網頁偵錯。

接著只要在終端機鍵入以下指令:

adb forward tcp:9222 localabstract:chrome_devtools_remote

然後在到pc上,打開chrome,在網址上輸入localhost:9222,就可以直接使用pc上的除錯工具了,比起jsconsle,對於開發者相對於友善多了。可以參考remote debugging