Angularjs directive uses attributes of scope

在angularjs中的directive的scope,分別有以下3種設定方式:

  • = or =attr : 指定需要連結的model名稱,會與parent scope的model互相綁定。
  • @ or @attr : 依照屬性的value傳入,來設定directive的scope值。
  • & or &attr : 將預設的function,委託給其他event呼叫。

只要directive有設定scope對應的值,或者設定scope:true,則directive將會自行建立一個新的scope。

使用 & 和 @ 屬性來設定scope

定義一個alert屬性:

1
<div alert on-enter="$window.alert('Hello world')" message="Say hello world!"></div>

其中message屬性為alert呈現的訊息,on-enter則會在按鈕被點擊即時會觸發。

實作一個alert directive:

1
2
3
4
5
6
7
8
9
10
11
12
13
14
15
app.directive( "alert", function(){

return {

restrict: "A",
template: "<div class='alert-container'><p ng-bind="message"></p><button ng-click='onEnter();'>Enter</botton></div>",
scope:{
"onEnter":"&",
"message":"@"
},
replace: true

};

});

alert的scope將會取得onEntermessage的屬性,分別去對照template的ng-click="onEnter()"ng-bind="message"

Demo

完整的範例,請參考jsfiddle上的code。

在angularjs限制同時間的request的數量

假設有多筆request要發送時,但又不希望一次全發送出去,希望將request的數量,在同個時段只出現5個request,這時候就需要一個manager之類的object去處理,在這裡使用ngHttpPool為例。

安裝ngHttpPool

使用bower安裝,或者至github下載:

1
bower install ngHttpPool

使用ngHttpPool

載入一個ngHttpPool module:

1
<script type="text/javascript" src="/bower_components/ngHttpPool/public/src/ngHttpPool.js"></script>

定義module相依性:

1
2
3
4
5
angular.module( "app", [ 
"ngHttpPool"
]).controller('ctrl',function( httpPool ){
//doSomething
});

建立一個pool和定義同時存在的最大request數量:

1
2

var pool = httpPool.create( 2 );

傳入config,發送多個request:

1
2
3
4
5
6
7
8
9
10
11
12
13
14
15

for( var index = 0; index<10 ; index++ ){

/**
* @param {Object} config
* @param {function} success is optional
* @param {function} error is optional
*/
pool.map({method:"get",url:"/",params:{id:index}}, function(){

console.log( "success" );

});

}

如果要等request都從server返回,可使用以下的方式:

建立一個defer,會將之後發送request都當作監聽對象:

1
2

pool.listen()

將config push到pool,執行request的發送:

1
2
3
4
5

for( var index = 0; index<10 ; index++ ){

pool.map({method:"get",url:"/",params:{id:index}});
}

結束監聽,當所有結果回傳時,將會執行promise.then:

1
2
3
4
5
6

var promise = pool.Promise();

promise.then(function(){
console.log( "all of the callbacks." );
});

Demo

可參考ngHttpPool github。

網頁已過期在IE7、IE8

網頁已過期在IE7、IE8

通常這個問題是當form submit出去後,再按上一頁、下一頁就會出現的問題,不過如果在form的action設為錨點,也可能引起這種狀況,而這種情況則是未升級到IE9會發生的。

實際狀況

第一種狀況
form submit出去,由使者點選上一頁、下一頁就會出現這種狀況,或者是透過程式控制history

1
2
history.go()
history.back()

第二種狀況
form的action為’#’時,會導致form送出之後,在被重新導向

1
2
3
<form method="post" action="#">

</form>

而第二種狀況比較特別,只在未升級的成IE9以上瀏覽器,用相容模式在IE8包括以下的瀏覽器,才會出現這種問題。至於目前使用的chromefirefoxIE9+都已經不會有這問題了。但第一種狀況IE還是會出現,其餘瀏覽器都會重新submit和保留之前的畫面。

angularjs-placeholder submit a form on IE

使用angularjs-placeholder可以在老舊IE上,支援placeholder這個屬性,但是底層還是去實作foucsblur這兩個event,並且用替換value的方式,達到模擬placeholder的效果。在一般使用上沒什麼太大問題,但是假設今天有一個formsubmit的時候,會把placeholder的預設值也一起送出,這時就必須在submit之前,就將預設值清除,或者在取值得時候,暫時將欄位值清除,之後在還原。

使用placeholder.ensure取值:

ensure接受兩個參數:

1
2
3
4
5
6
7

/**
* @param {jQlite} $elem 可以是form或者為多個elements
* @param {function} callback 實際取值的地方
*/


placeholder.ensure( $elem, callback );

callback裡面取得值後,可使用record.back來回復placeholder的預設值。

1
2
3
4
5
6
7
8
9
10
11
12
app.controller( "formController", [ "placeholder", "$element", function( placeholder, $form ){

placeholder.ensure( $form , function( record ){

var $textarea = $form.find("textarea");
alert( $textarea );

//復原
record.back();
});

});

若要直接submit可直接呼叫ensure,不須使用callback。

1
placeholder.ensure( $form )

如果使用有支援placeholder的瀏覽器,還是會有ensure可以使用,但是將不會改變任何屬性,純粹只是個包裝過後的function。

Fixed a placeholder feature on IE (angularjs)

Placeholder要支援老舊的IE7~IE9,使用jQuery也都有一堆plugin可以使用了。如果要在angularjs上使用,但是又不想載入jQuery,這時候可以使用angularjs-placeholder module。

使用angularjs-placeholder

載入angular module:

1
<script type="text/javascript" src="../src/angularjs-placeholder.js"></script>

定義需要使用到的module,和初始化ng-app:

1
2
3
4
<script type="text/javascript">
var app = angular.module( "demoApp", ["html5.placeholder"] );
angular.bootstrap( document, [app.name] );
</script>

實作angularjs-placeholder遇到的小問題

在實作angularjs-placeholder module時,在IE7發現一個小問題,無法取得placeholder的值,但是在有的jQuery情況,都會幫忙處理掉了。

1
2
3
4
5
6
7
8
9
10
11
12
13
14
15
16
/**
* input default: <input placeholder="Please,enter your name!" type="text" />
*/


//use native

var attr = input.getAttribute("placeholder");

// attr == null
console.log( attr );

//use jqlite
var $elem = angular.element( input );

// attr == null
console.log( $elem.attr( "placeholder" ) );

所以如果要在IE7取得placeholder,這時候native有提供另一個api可以使用。

1
2
3
4
5
6
var node = input.getAttributeNode( "placeholder" );

var attr = node?node.nodeValue:node;

//Please,enter your name!
console.log( attr );

Javascript prototype and this記憶體用量

在javascript中,使用function建立一個object時,用prototype來配置屬性,被建立的object會指向同一個prototype object,而使用this建立的,則會是獨立的屬性

Example:

定義TomMary二個人。

1
2
3
4
5
6
7
function Tom(){

}

function Mary(){

}

使用prototype定義John的父母,分別為TomMary

1
2
3
4
5
6
John.prototype = {
parents:{
dad:new Tom(),
mom:new Mary()
}
};

this的方式定義John的父母。

1
2
3
4
5
6
7
function John(){

this.parents = {
dad:new Tom(),
mom:new Mary()
};
}

然後用thisprototype的方式,各自建立1000000

1
2
3
4
5
var people = [];

for( var i = 0; i < 1000000 ; i++ ){
people.push( new John() );
}

結果如下:

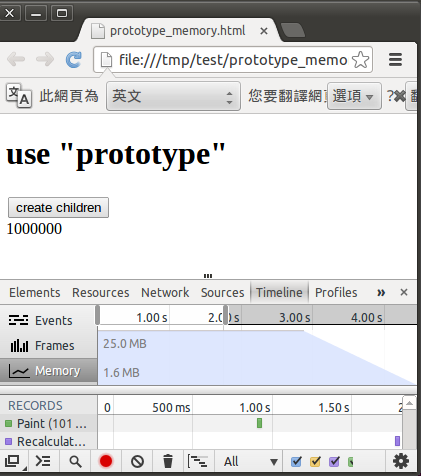
使用prototype的方式
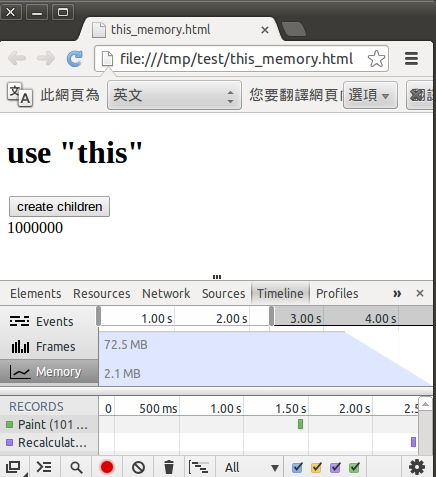
使用this的方式

this使用的記憶體為72.5m,而prototype的記憶體是25m,由此可知,使用prototype來建立多個object,會節省很多記憶體。


完整Prototype Example:

1
2
3
4
5
6
7
8
9
10
11
12
13
14
15
16
17
18
19
20
21
22
23
24
25
26
27
28
29
30
31
32
33
34
35
36
37
38
39
40
41
42
43
44
45
46

<!DOCTYPE HTML>
<html lang="en">
<head>
<meta charset="UTF-8">
<title></title>
</head>
<body>
<h1>use "prototype"</h1>
<button id="create">create children</button>
<div id="count">0</div>

<script type="text/javascript">
function Tom(){

}

function Mary(){

}

function John(){

}

John.prototype = {
parents:{
dad:new Tom(),
mom:new Mary()
}
};

var people = [],countElem = document.querySelector("#count");

document.querySelector("#create").addEventListener( "click", function(){

for( var i = 0; i < 1000000 ; i++ ){
people.push( new John() );
}

countElem.innerHTML = people.length;
});

</script>
</body>
</html>

完整This Example:

1
2
3
4
5
6
7
8
9
10
11
12
13
14
15
16
17
18
19
20
21
22
23
24
25
26
27
28
29
30
31
32
33
34
35
36
37
38
39
40
41
42
43
44
45
46
47
48
49

<!DOCTYPE HTML>
<html lang="en">
<head>
<meta charset="UTF-8">
<title></title>
</head>
<body>
<h1>use "this"</h1>
<button id="create">create children</button>
<div id="count">0</div>

<script type="text/javascript">

//define dad
function Tom(){

}

//define mom
function Mary(){

}

//define child
function John(){

this.parents = {
dad:new Tom(),
mom:new Mary()
};
}


var people = [],countElem = document.querySelector("#count");

//create children
document.querySelector("#create").addEventListener( "click", function(){

for( var i = 0; i < 1000000 ; i++ ){
people.push( new John() );
}

countElem.innerHTML = people.length;
});

</script>
</body>
</html>

Javascript Prototype的概念

javascript的prototypethis,是剛接觸javascript的人比較難理解的。在javascript裡,假設定義一個一個Bird function時,可使用同個prototype建立不同物件,也就所有經由Bird function產生的物件,都會擁有相同的protoype的屬性。

Example:

定義一隻鳥,這種鳥的名稱叫做Sparrow

1
2
3
4
5
6
7
function Bird(){
//do something
}

Bird.prototype = {
name:"Sparrow"
};

接著建立兩個變數,分別為Tom的寵物

1
2
var bird = new Bird();
var petOfTom = new Bird();

Tom把他的寵物稱為Raven,而這種的名稱,重新命名為Black Sparrow

1
2
3
petOfTom.name = "Raven";

Bird.prototype.name = "Black Sparrow";

最後你就會發現一個有趣現象,即使這種的名稱重新命名了,Tom的寵物仍然會以Tom命名的方式顯示

1
2
3
4
5
//name of bird:Black Sparrow 
console.log( "name of bird:" + bird.name );

//Tom's pet called him: Raven.
console.log( "Tom's pet called him: " + petOfTom.name + "." );

也就是說也就是說,當prototype的name改變時,其他經由Bird new出來的object name,都會跟著修改但是被new出來的object,一旦屬性被修改,不管之後prototype如何更動,則object的屬性會依照你所指定的修改


完整範例:

1
2
3
4
5
6
7
8
9
10
11
12
13
14
15
16
17
18
19
20
21
22
23
24
25
26
27
28
29
30
31
32
33
34
35
36
37
38
39
40

<!DOCTYPE HTML>
<html lang="en">
<head>
<meta charset="UTF-8">
<title></title>
</head>
<body>

<script type="text/javascript">

function Bird(){

}

Bird.prototype = {
name:"Sparrow"
};

var bird = new Bird();
var petOfTom = new Bird();

console.log( "name of bird:" + bird.name );

//rename
petOfTom.name = "Raven";

//rename
Bird.prototype.name = "Black Sparrow";

console.log( "rename..." );

console.log( "name of bird:" + bird.name );

console.log( "Tom's pet called him: " + petOfTom.name + "." );

</script>

</body>
</html>

Running AngularJS App on IE7

IE7需要額外在body宣告宣告id和ng-app屬性:

1
<body id="ng-app" ng-app="myapp">

盡量使用class、attribute的寫法,例如:

1
2
<div class="ng-view"></div>
<div ng-view></div>

若要在IE7使用angular自訂定義的tag,而不採用上述方式,如下:

1
<ng-view></ng-view>

需要先執行以下script,可參考官方說明

1
2
3
4
5
6
7
8
9
10
11
12
<!--[if lte IE 8]>
<script>
document.createElement('ng-include');
document.createElement('ng-pluralize');
document.createElement('ng-view');

// Optionally these for CSS
document.createElement('ng:include');
document.createElement('ng:pluralize');
document.createElement('ng:view');
</script>
<![endif]-->

在IE8、IE7使用angular.fromJson,需額外include script,http://bestiejs.github.com/json3/

1
2
3
<!--[if lte IE 8]>
<script src="/static/js/libs/json3.min.js"></script>
<![endif]-->

weinre

weinre是一個用於瀏覽器的遠端除錯工具,運作方式與jsconsole相同,都是透過include一隻外部js script,來與server溝通傳遞資料。但是jsconsole只提供一些很基本功能,如果要能像chrome一樣,查看dom element、network等功能,可以使用weinre

使用時機:

使用android、ios等手持裝置的browser,或者對IE除錯的時候,都很適合。

weinre原理:

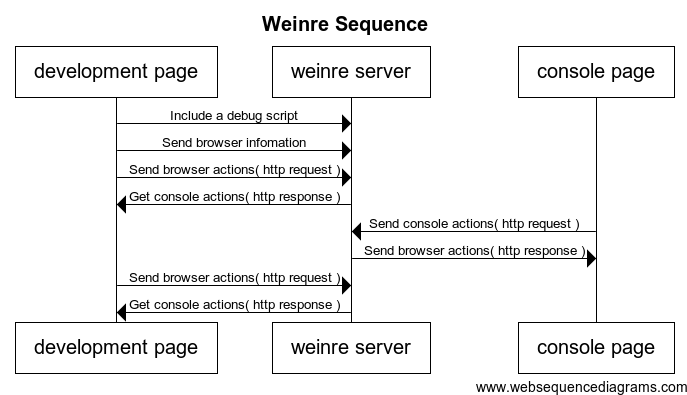
weinre基本原理是,建立一個console page,然後經由weinre server,與development page(你要除錯的page)互相傳遞資料溝通。( 溝通方式採用long polling)

時序圖如下:

 
透過node.js安裝:
sudo npm install -g weinre
操作流程:

開啟weinre server:

weinre --httpPort 8081 --boundHost localhost

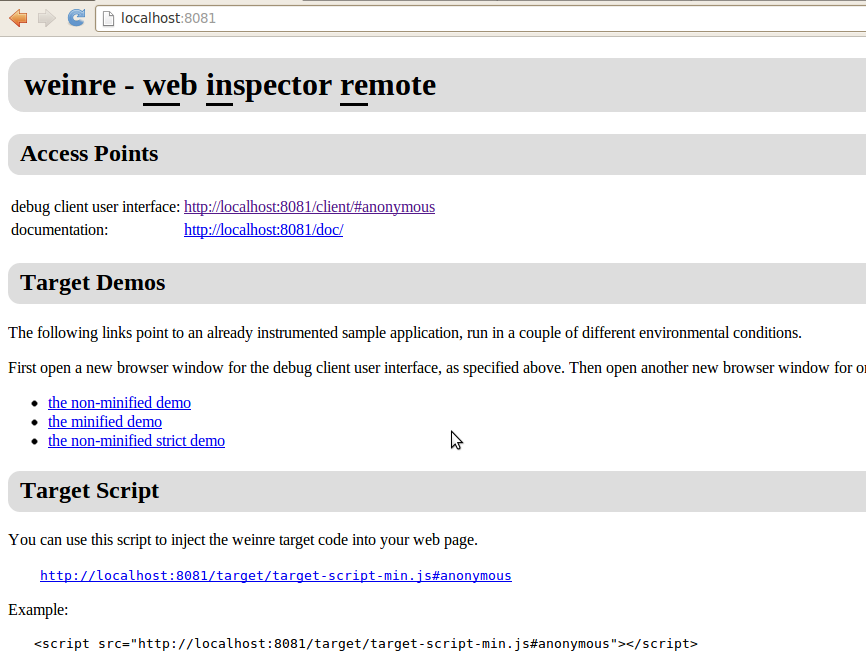
打開瀏覽器輸入http://localhost:8081/

然後在你想要除錯的頁面加上以下script:

<script src="http://localhost:8081/target/target-script-min.js#anonymous"></script>

例如:

<!DOCTYPE HTML>                                                                                  
<html lang="en">                                                                                 
<head>                                                                                           
    <meta charset="UTF-8">                                                                       
    <title></title>                                                                              
    <script src="http://localhost:8081/target/target-script-min.js#anonymous"></script>       
</head>                        
<body>                                                                                           
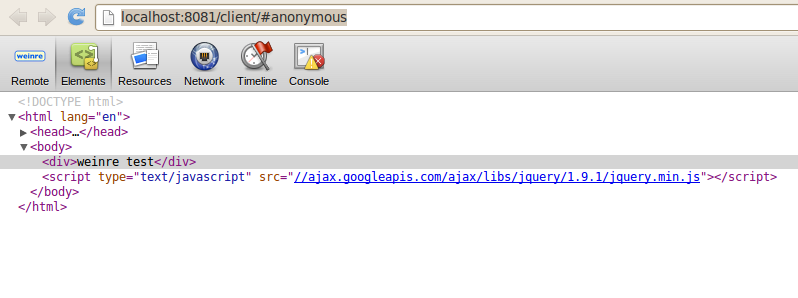
    <div>weinre test</div>                                                                       
    <script type="text/javascript" src="//ajax.googleapis.com/ajax/libs/jquery/1.9.1/jquery.min.js"></script> 
</body>                                                                                          
</html>                                                                                          

開啟http://localhost:8081/client/#anonymous,就可以開始除錯了。

jquery uploader

使用ajax upload還滿常使用到,但是又不需要一些複雜的功能,所以就寫了一個簡單的jquery uploader

需求如下:
  1. 將form經用ajax post出去。
  2. 選擇要post的欄位包括file。
支援:
  1. firefox
  2. chrome
  3. IE10+

使用ajax submit整個form:

//opts.success(result):上傳成功
//opts.progress:處理進度
//opts.fail:上傳失敗

$("form").uploadForm( opts );

uploadForm會自動抓取form的action連結,目前此plugin只能一次抓取一個form upload。

使用ajax submit部份欄位:

//url:要上傳的目標連結

$( "input[name='file'],input[name='id']" ).upload( url, opts );

如果要支援IE10以下瀏覽器,現在已經另外實作iframe uploader,目前可以支援uploadForm這個功能,但是僅支援success這個參數。

github